Creating Barcoded Labels
QR Code Template
See this link for the template for May 2023 CviMVPe QR code labels. Please look over the README tab before making any edits to the page.
Make sure to re-create all the QR codes before you print.
Then make sure to test the QR codes on the computer screen before you print! - We have had issues with the QR codes not matching the labels, which may happen when someone makes new labels but forgets to update the QR codes. When in doubt, we go with the written label and not the QR codes
Sometimes the labels near the top and bottom can be cut off if the label paper feeds into the printer too slowly because it is thicker. Make sure the text is centered vertically within the cell for printing.
To arrange printing quickly in Sheets, select the cells you want to print. Then go to File –> Print –> Print [Selected Cells in Dropdown] –> Fit to page
Tips for getting labels to stay:
make sure the label is at least 1.5 inches long, so it can wrap all the way around and then the two sticky ends can sandwich together. Most labels do not stick when they are overlapped, but if you sandwich the sticky ends, they will stick on really well.
Make sure if you are printing barcodes that they are at the far right side of the label, so when they are wrapped around they are flat for reading into a phone
Example image of tube without barcodes below:

Tips for printing:
take out all the paper from the printer
For the MSC color printer (HP M553), the label side should be face up. For the MSC B&W printer (HP laser jet 600), the label side should be face down. The B&W printer should be your first option since the labels are less likely to be stuck if you load several at once.
copier technique If you run into issues with the printer (e.g. label paper gets stuck or smearing when printing), try printing to paper and then using the copier to print onto the label paper. Put the paper template in the copier. Then put the label paper on the feed on top of the copier with the label side face up. Copy.
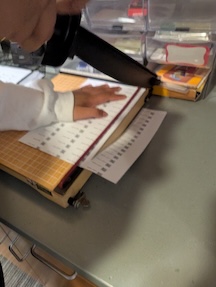
Tips for slicing
- The slicer has a trick of the wrist - you really need to apply pressure by pushing it inward toward the side of the plate
- You don’t want to slice all the way through - once you do that it becomes hard to keep track of the order of everything. If you slice “most” of the way through but leave a bit at the bottom, it will be easy to go through the labels in order and cut them off one-by-one.
Neato Labels Matte Finish Waterproof White - Vinyl Labels
- The nice thing about these is that you can print to whatever size works for you and then cut them with scissors (it doesn’t work to slice it)
- Calculate how many labels per sheet - about 4 columns by 17-20 rows works well
- Use the QR code template to create the labels
- Test printing on a regular piece of paper and make sure the arrangement is good
- Take all paper out of the MSC B&W printer and put in one piece of label paper with the sticker side UPSIDE DOWN
- Let the B&W printer cool off for a minute between printing sheets.
- If the B&W printer is failing, try the copier techinque
- The slicer works following the recommended techniques
Notes on this paper
- Camille tested these in the freezer over the weekend and they worked well, as long as the labels are wrapped all the way around and the sticky ends are sandwiched
- We tested this in the color printer and the paper gets too hot and gets stuck!
- We have tested if the labels smear with ethanol following the above protocol and do they not!
Don’t try again:
- Cryo-Babies CRYO tags - Cat 9187-1700 - these don’t stick to the vials
Microtube tough-tags - TTSW 2240 0.5 in by 0.94 in - from MidSci - these can work if they were longer - there are ones that are 2.5 inches long but the company has a 2 week lead time on ordering them!
Note: TSC printer is in the shared equipment lab, hooked up to the Plate Reader laptop.
Create an excel spreadsheet with the sample IDs for your labels. Type “ID” on cell A1 and list your label IDs on the following rows (you can use more than one column).
Launch the software BarTender Designer (a shortcut should be pinned to the taskbar).
In the welcome screen, ‘Open a recently used BarTender document’ or ‘Open an existing BarTender document’.
If you accidentally close the welcome screen, go to File > New > New Document Wizard > Existing BarTender Document > Select > Select a template document > Open > Finish (not Next).
This will define the printer model (we only have one) and the type of stock label (we only have one) so you don’t need to enter these paramenters manually (saves time).
File > Save as > ‘yourfilename’.
On the document you just created (‘yourfilename’), click on the barcode on the screen and delete it, so you have a blank label.
Create > Barcode > code 93 > then click anywhere on the label to place the barcode.
- This will place a barcode on the label on the screen. Roughly adjust the size of the barcode to fit the label.
On the left side panel, right-click on Database Fields > Database Connection Setup > Configure Connection > Browse and select the Excel file with your sample IDs > Finish (not Next) > Ok.
This will add your sample ID next to the barcode on the label.
If the window “The format of the database in ‘yourexcelfile’ does not match the old database” pops up, click yes. Then click to highlight Sheet$1 and hit Finish.
On the left side panel, click on ‘Barcode’ to highlight it. Then go to Edit > Properties.
Under Human Readability > Placement, select “Right” (this is recommended because of the shape of labels we currently have; if using another label, edit barcode placement and sample ID placement accordingly). Horizontal offset: “0.03” is recommended, but will depend on the length of the barcode and sample ID.
Symbology and Size: the type, size and placement of the barcode on the label can be edited here, if needed.
Font, Text Format, Border and Position can be edited here, if needed.
Under Datasource, right-click the embedded data (should appear as 12345678), and delete.
Right-click on Datasource > New > Database field > Next > Select field name (“ID”, or whatever else is in the first row of you excel file) and delete whatever is in ‘Sample Field Data’ > Finish.
- This should show the first sample ID next to the barcode on the label. You might need to edit font size to fit the label. (Don’t exit barcode properties). In Font, select the appropriate size under Point Size > Close.
Re-size the barcode and sample ID within the margins of the label if necessary, by adjusting the barcode window on the label and/or editing barcode properties until your label looks the way you want (keep in mind the labels are small so try to maximize font size to fill out most of the label.
- At the bottom of the screen, you should see the number of labels you’re creating – should match the rows on the excel file. Use the arrows to scroll through the labels and make sure they all fit within the margins of the labels. Adjust accordingly, if needed.
Hit Print on top of the page or File > Print. It’s recommended to print the first ~5 labels first to see how the come out. To do that, select “Selected” under “Queried Records” and type 1-5 in “Selected Records”. Hit Print. If looks ok, print the rest. If you want to print all at once, select “All” under “Queried Records”.
Cut off your labels from the printer, close document, close software.