PicoGreen Assay
Last updated by M.G.E. on 10/18/24
The protocol for checking quantification of DNA using the PicoGreen Assay on the Synergy HTX Plate Reader.
When running a full plate of samples, the PicoGreen is more time-efficient than running the Qubit since you can run a 1/2 plate - 3/4 of a plate at once. However, if your standards do not pass quality control, you will need to re-run the entire assay. If this is your first time running the PicoGreen, consider doing a practice run with just standards to ensure that you can make the dilution series. Always keep the plate of your 1:10 DNA dilution in the fridge in case you have to re-run the assay, and then you will not waste eluted DNA!
However, although the PicoGreen and Qubit both use flourescence to quantify DNA, in our experience the amounts reported by PicoGreen are about twice the amounts reported by Qubit. Therefore, we recommend dividing the Picogreen amounts by 2 and using that number in your calculations. Meeting notes
See the Pipetting Tips page for advice on good pipetting practice and troubleshooting.
Background
PicoGreen dsDNA Quantitation Reagent is an ultra-sensitive fluorescent nucleic acid stain for measuring the amount of double-stranded DNA in your eluted product using a flourescent dye. The most commonly used technique for measuring nucleic acid concentration is absorbance at 260 nm (A260).
Materials & Reagents for running a full plate of samples (96)
2 flat bottom black Costar 96-well plates (Fisher Cat #: 07-200-627) (long drawer under microscopes)
PCR plate, 96-well, 0.3 mL, semi-skirted (Fisher Brand, Cat#: 14230244) (shelf above post-PCR pipettes)
Two 15 mL Falcon tubes (box under corner of lab benches)
Two 0.2 mL snap cap tubes for ladder dilutions, you can use Qubit tubes (in boxes on shelf above PCR machines)
Eluted DNA samples diluted to a 1:10 concentration
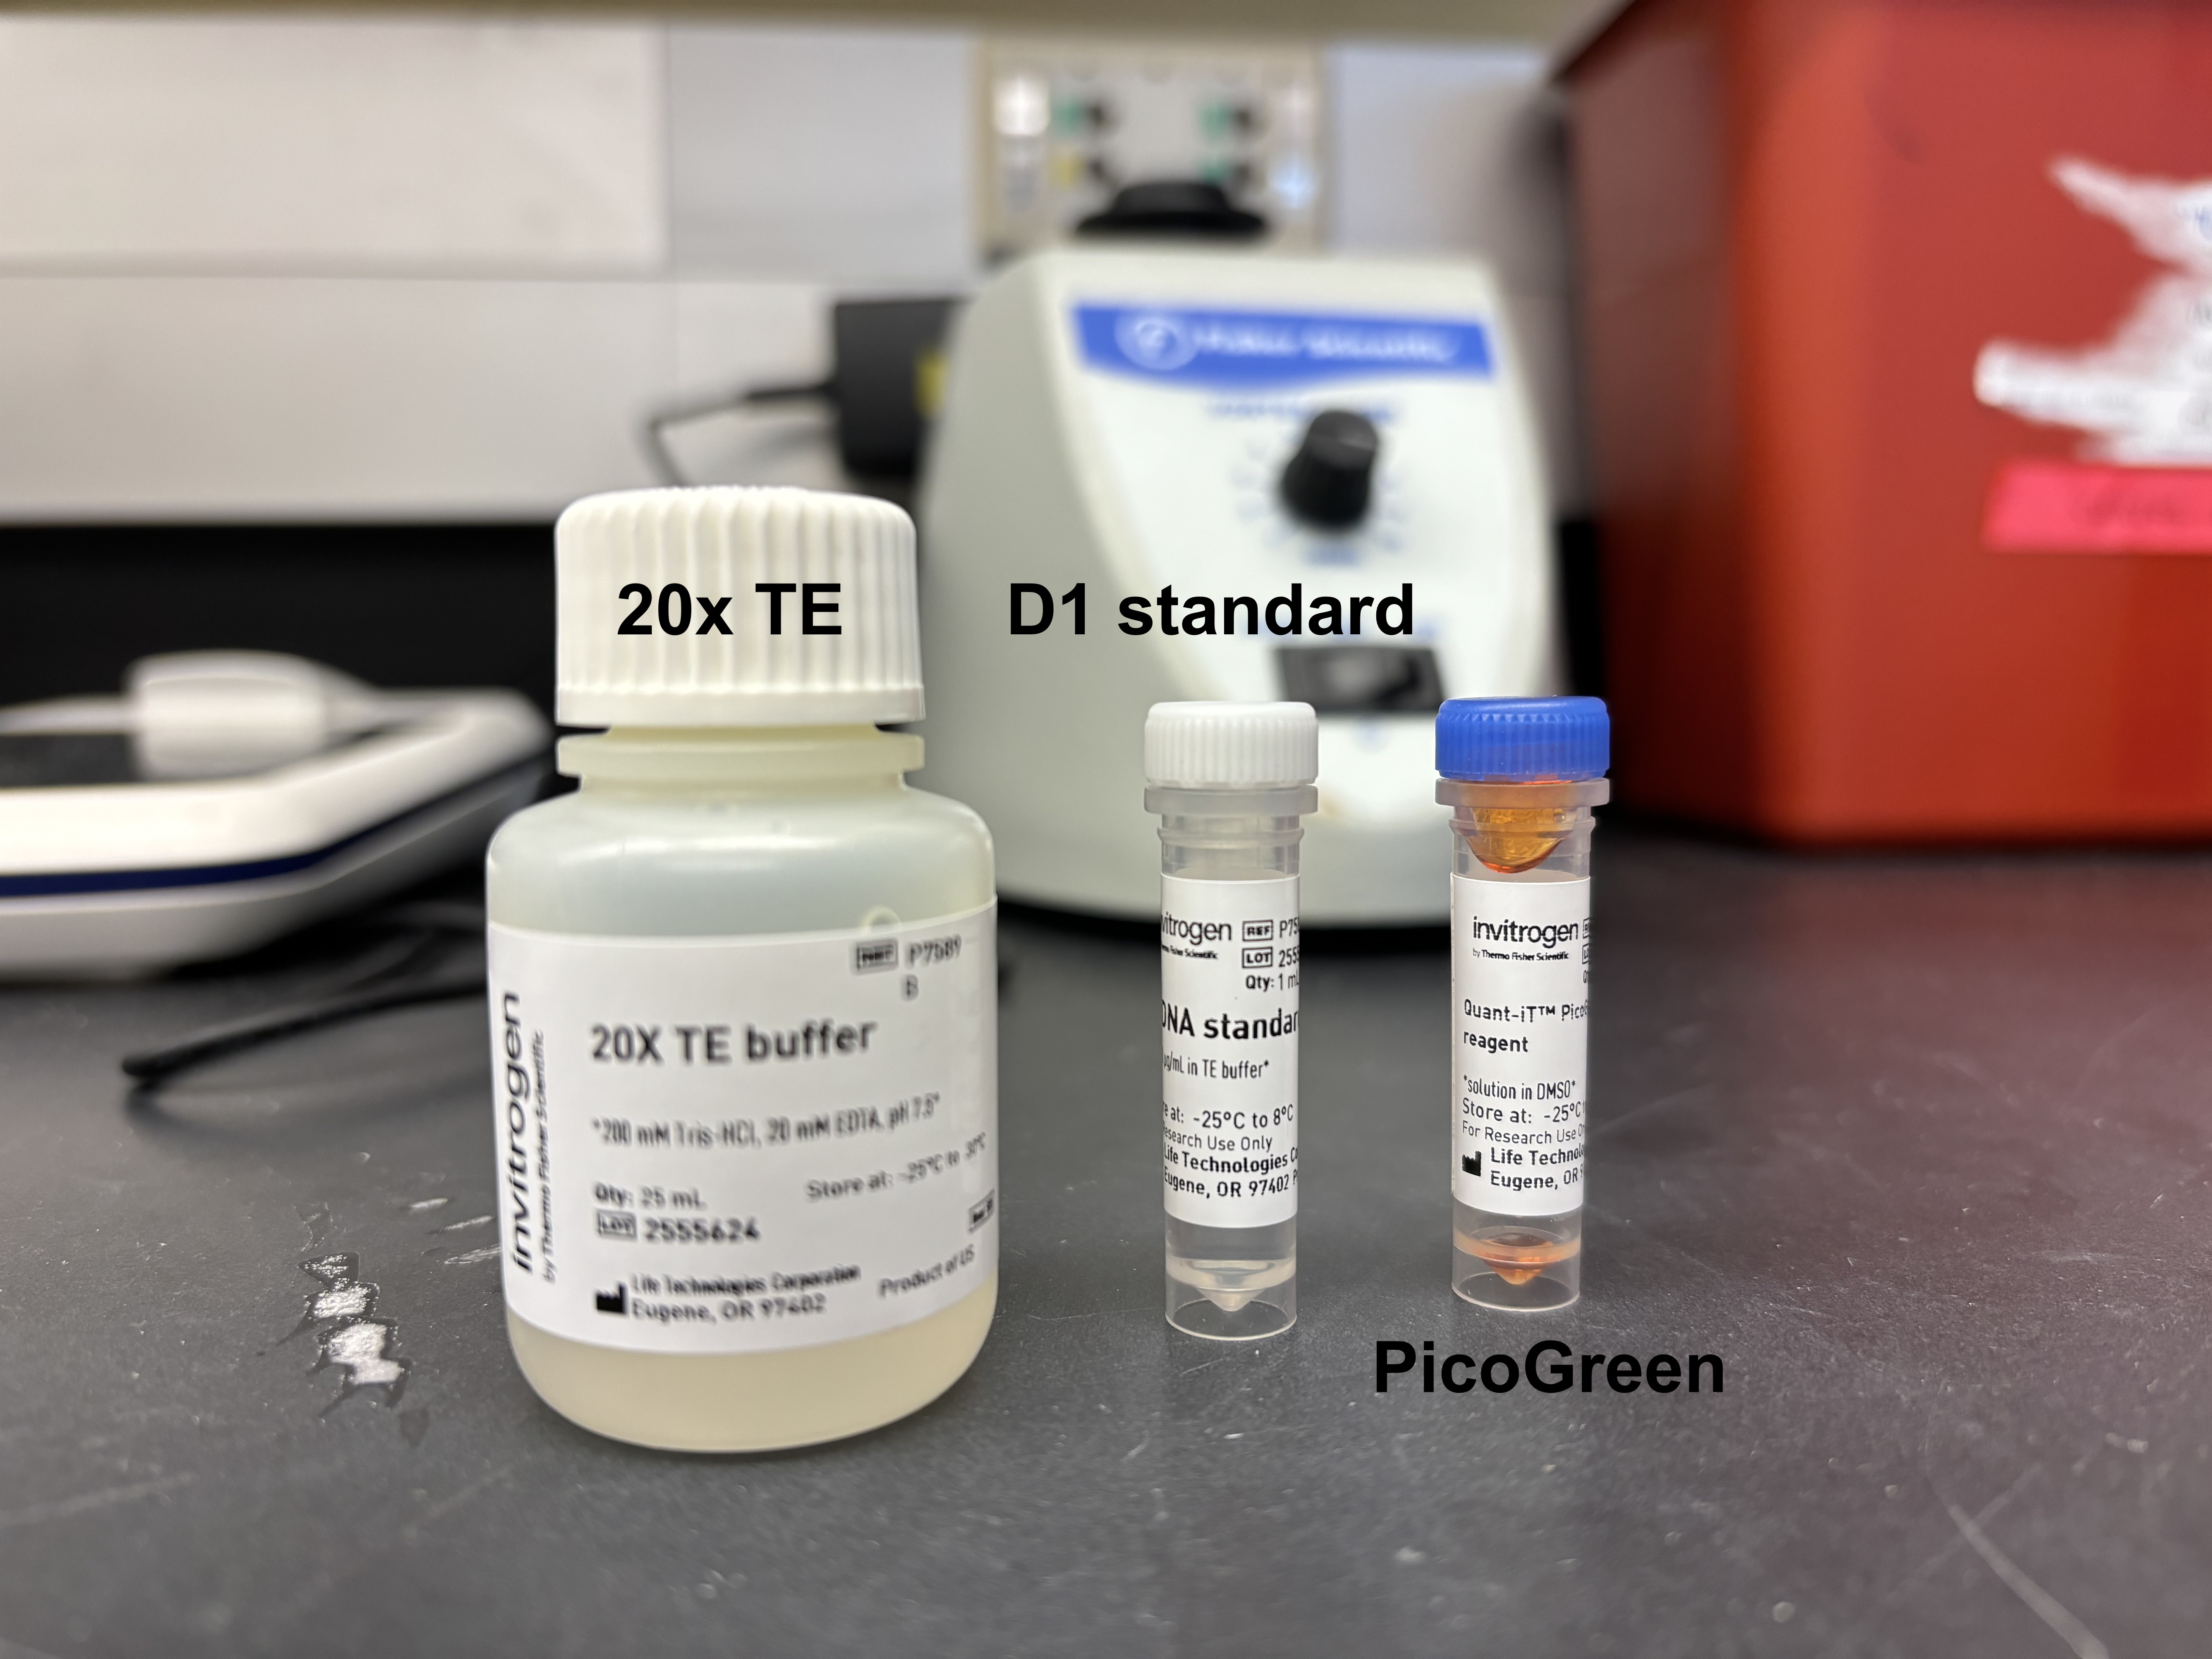
Materials from Invitrogen Quant-It PicoGreen dsDNA Assay Kit, cat #P7589 (in No Animals fridge)
20X TE Buffer
PicoGreen Dye
DNA Ladder 100 ug/mL
Molecular grade H2O (Fisher Scientific: Water, Molecular Grade Biology, cat#: BP2819-10)
MilliQ H20 (from OGL lab space)
Ice in rubber lab container
Equipment
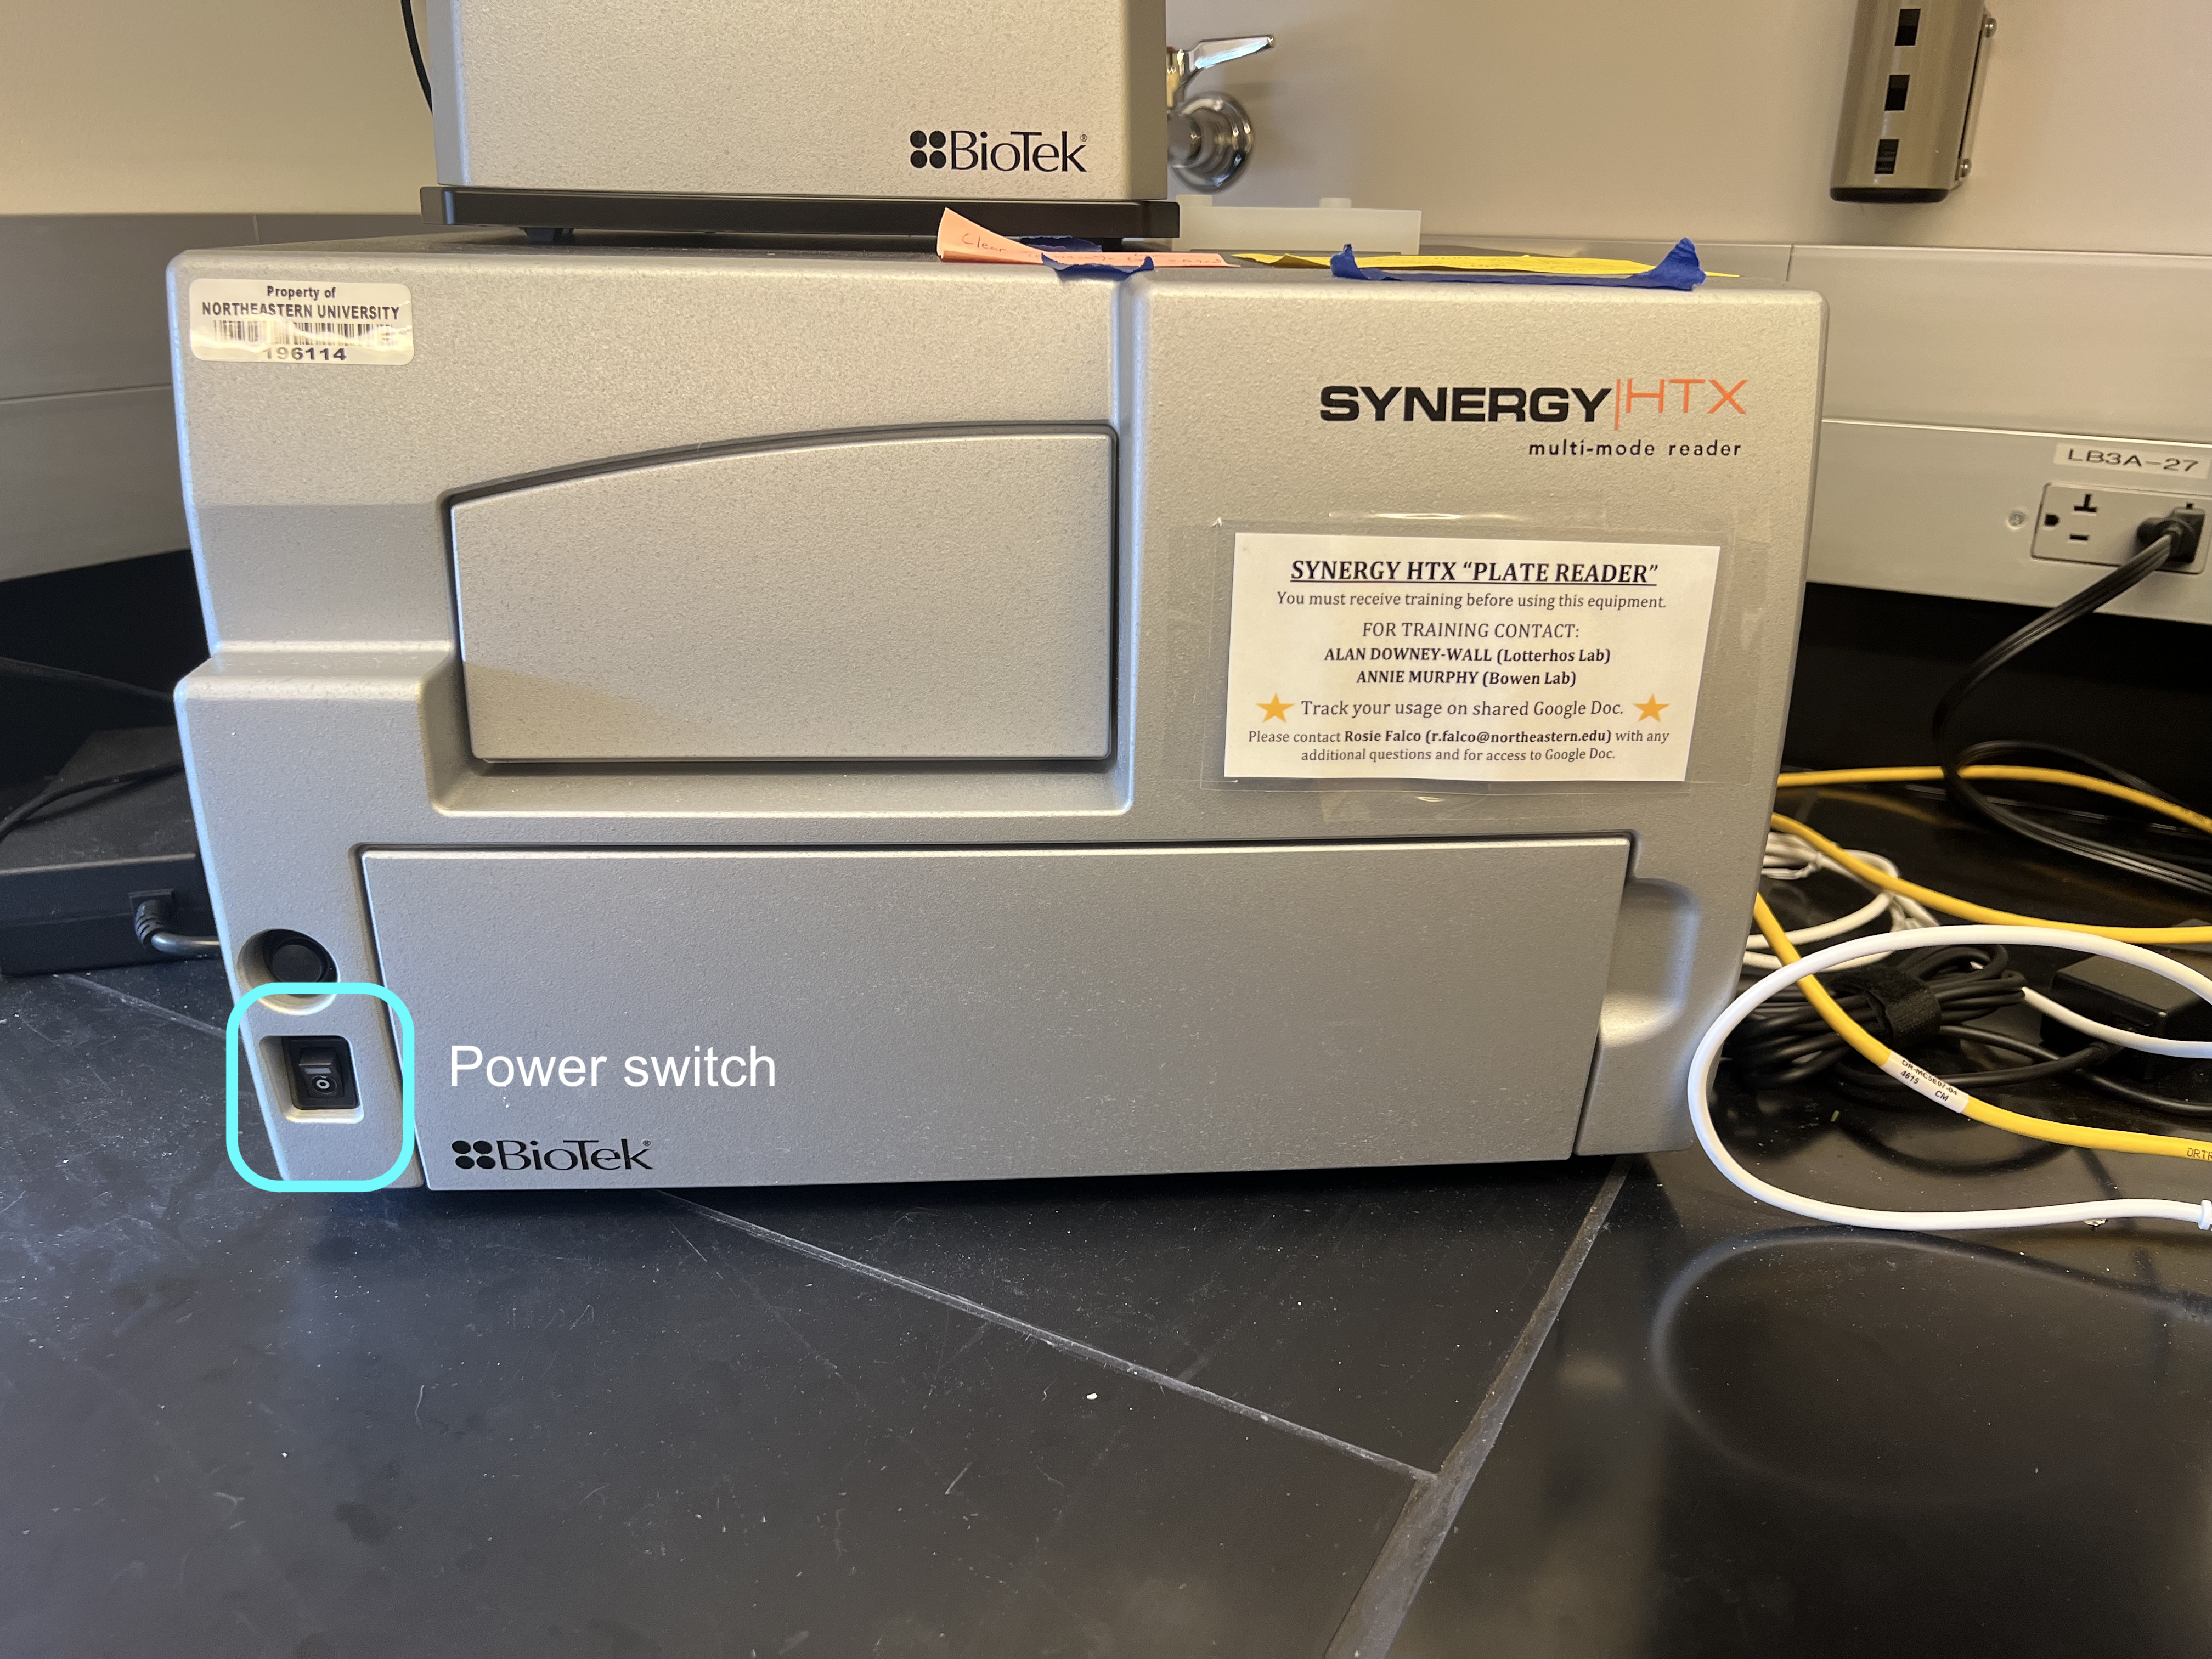
Synergy HTX plate reader in shared molecular space
Lotterhos Lab centrifuge (Eppendorf, Centrifuge 5430 R)
Vortexer
Mini centrifuge
E-Pet, 2mL tip, 25mL tip
1000ul single channel, 2.5ul single channel, 10ul single channel, 100ul single channel, 100ul multichannel, and 10ul multichannel pipettes and tips
Important Notes
- PicoGreen dye is a solid when stored at 4C. Allow the dye to come to room temperature before use. Take out the kit and leave on the counter before starting protocol to ensure it becomes a liquid.
Protocol
This protocol order is optimized to reduce DNA degredation and be as efficient as possible. It’s recommended that you follow the steps in the exact order they’re detailed here!
Step 1: Prep the plates
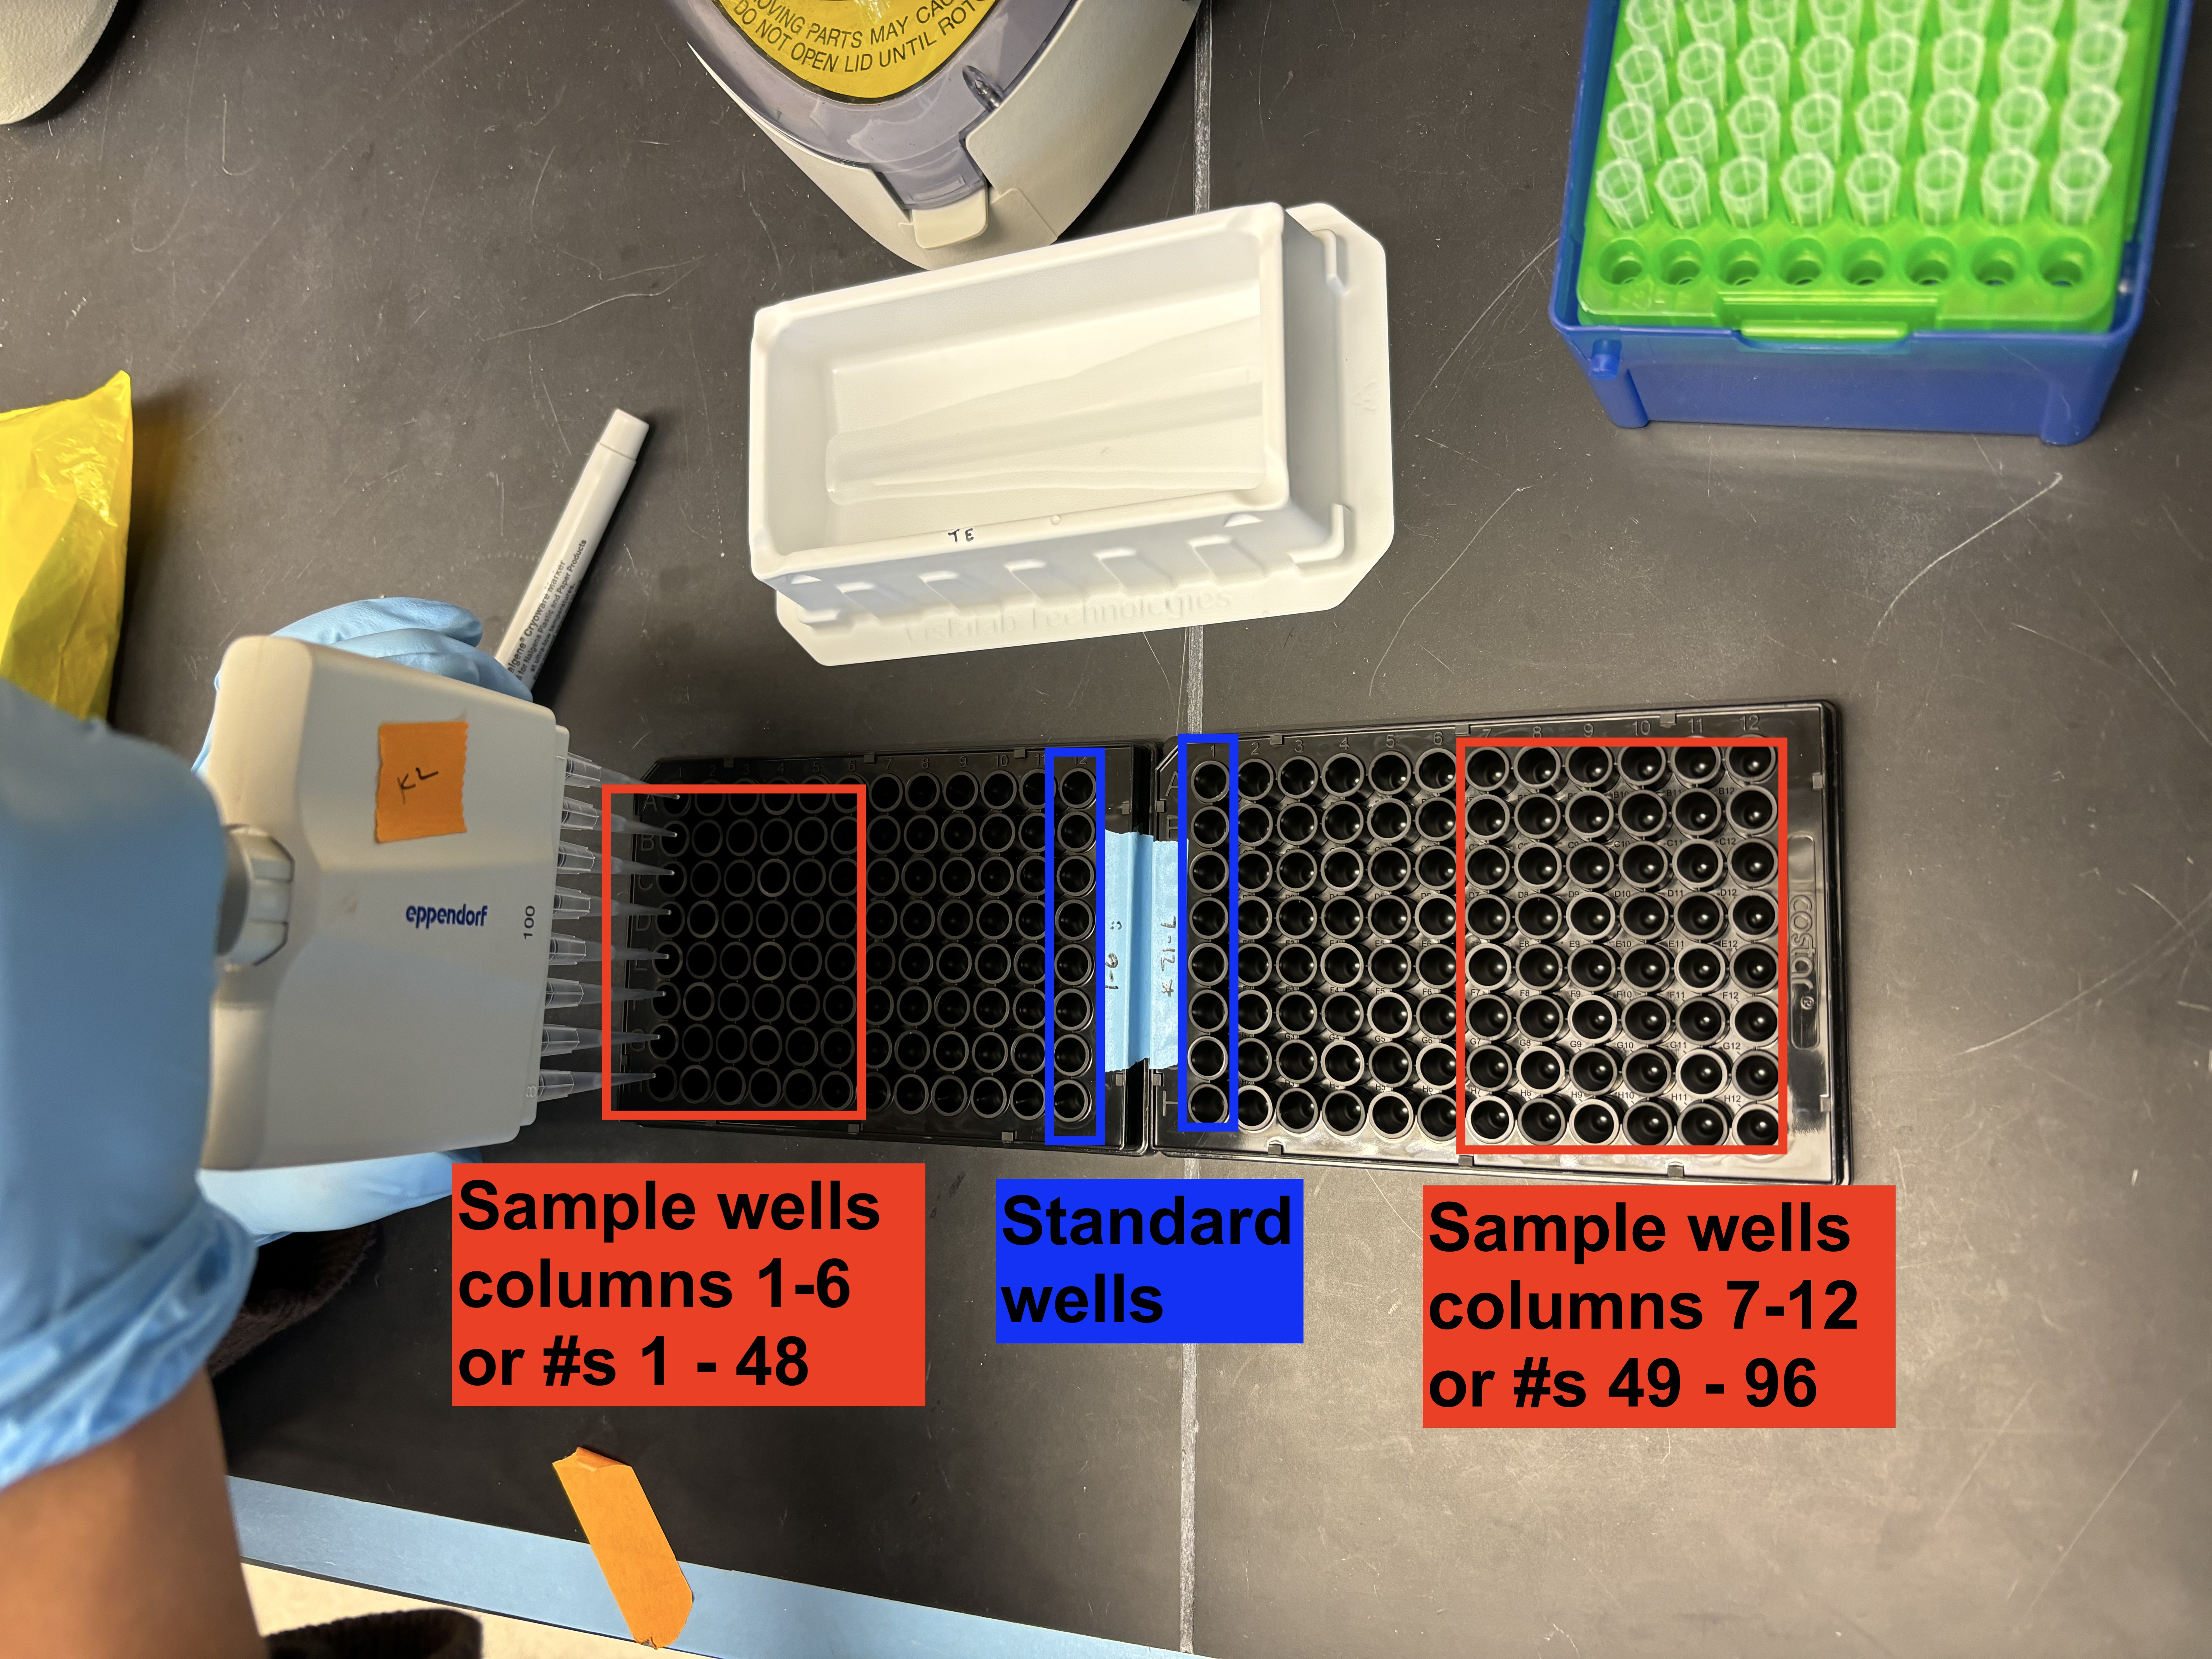
The first or last column of your plate needs to be saved for the ladder standards. Therefore, if you are running 96 samples, they will not all fit on one plate (the max on one plate with standards is 88).
So, If you are quantifying a full plate of samples, set up 2 black flat-bottom 96-well plates. Use the first one for your samples from columns 1-6. The Picogreen standards will go in column 12. Use the second plate for your samples from columns 7-12. The PicoGreen standards will go in column 1. Label both plates with lab tape (see example picture).
Step 2: Dilute 20x TE to 1x TE
- The Picogreen kit comes with a 20x concentration of TE (largest bottle in the kit). Dilute this to a 1x concentration in a 15 mL falcon tube by using the 25mL Easy-Pet tip to add 9.5 mL of molecular grade water and using the p1000 single channel pipette add 500 uL of 20x TE. (1 batch = 9.5 mL H20, 500 uL 20x TE; 2 batches = 19 mL H20, 1000 uL 20x TE). 1x TE is stable long-term, so feel free to make a double batch if you know you’ll run PicoGreen again soon!
Step 3: Add 49 uL of 1x TE to all sample wells
- Using the p100 multichannel, add 49 uL of your diluted 1x TE to each of the sample wells (cols 1-6 in plate 1, cols 7-12 in plate 2). Don’t add anything to your standard wells yet.
Step 4: Add 1x TE into the standard wells
- The standard wells are going to increase in volume of TE as the volume of ladder decreases. Follow this dilution series and add just the 1x TE to each of the stanard wells (col 12 only in plate 1; col 1 only in plate 2).
| Standards | Concentration (ng/mL) | 1X TE Vol (uL) |
|---|---|---|
| well 1, A | 500 | 25 |
| well 2, B | 250 | 37.5 |
| well 3, C | 100 | 45 |
| well 4, D | 10 | 45 |
| well 5, E | 4 | 48 |
| blank, F | 0 | 50 |
- Plate reader can read samples between 25 pg/mL - 1,000 ng/mL (or 0.000025 - 1 ng/uL). To be conservative we make the highest concentration for our ladder 500 ng/mL.
Step 5: Make ladders D1 and D2
This recipe will make enough to run 2 plates with a little extra left over for pipetting error.
Create your ladder standards using Table 1. The stock ladder is at 100 ug/mL. To make Dilution 1 at 2 ug/mL, use the P2.5 and P100 single channel pipettes to combine 2 uL of stock ladder with 98 uL of 1X TE in a 0.2 mL snap cap (Qubit) tube. Vortex and spin Dilution 1 in the mini centrifuge.
To make Dilution 2, use the P2.5 and P10 single channel pipettes to combine 2 uL of Dilution 1 and 18 uL of 1X TE in another 0.2 mL snap cap tube. Vortex and spin Dilution 2 in the mini centrifuge.
TABLE 1 - Standard Dilutions
| Ladder Type | Concentration (ug/mL) | Ladder Type | Ladder Vol (uL) | 1X TE Vol (uL) |
|---|---|---|---|---|
| D1 | 2 | Stock | 2 | 98 |
| D2 | 0.2 | D1 | 2 | 18 |
Step 6: Add ladders to your standard wells
- Now, add the required amounts of D1 or D2 to each of your standard wells. They already have the 1x TE added from step 4.
| Standards | Concentration (ng/mL) | Ladder Type | Ladder Vol (uL) | 1X TE Vol (uL) |
|---|---|---|---|---|
| well 1, A | 500 | D1 | 25 | 25 |
| well 2, B | 250 | D1 | 12.5 | 37.5 |
| well 3, C | 100 | D1 | 5 | 45 |
| well 4, D | 10 | D2 | 5 | 45 |
| well 5, E | 4 | D2 | 2 | 48 |
| blank, F | 0 | - | - | 50 |
Step 7: Create your PicoGreen
Your PicoGreen should be at room temperature, but if it’s not, hold it in your hand to help it liquify.
If you are running 96 samples over 2 plates (standard amount), make the PicoGreen by combinging 29.7 uL of PicoGreen and 5910.3 uL of 1x TE into a 15 mL falcon tube. (see eq. below for calculation or on pg. 17 of M.G.E.’s lab notebook)
If you need to make a custom amount of PicoGreen (other than the exact amount for 1 plate above), use Equation 1 to determine how much stock PicoGreen dye you need for the number of samples/standards you are running. Then use that value to calculate the amount of 1X TE this should be added to for a 200 times dilution using Equation 2.
Equation 1
- Calculates the volume of undiluted stock PicoGreen needed to make diluted PicoGreen for a given number of standards and samples.
\[ \frac{1.1 * 50 \mu L \textrm{ diluted PicoGreen * (Num. samples + Num. standards)}}{200} = \textrm{vol PicoGreen Stock needed} \tag{1}\]
Equation 2
- Calculates the volume of 1X TE needed to dilute the stock PicoGreen.
\[ 199 * \textrm{vol of Stock PicoGreen} = \textrm{vol of 1x TE} \tag{2}\]
Step 8: Prep your 1:10 DNA dilution
Why do we do a 1:10 dilution? For example, typical quantifications for Atlantic cod or eastern oyster DNA extractions using a spin column plate is between 10 - 200 ng/uL. Therefore, you should do a 1:10 dilution because the reaction does a 1:100 dilution in the reaction itself. This brings the final DNA concentration to 10 - 200 ng/mL which is well within the range of the assay.
Fill a styrofoam box with ice. Place your samples on ice and keep them there the whole time they’re out of the fridge to prevent degradation.
Once samples have thawed, vortex and centrifuge the plate to make sure DNA is spread evenly throughout the sample. There are plates of practice DNA in the -20 freezer that you can use as a counterweight.
Use the Easy-Pet with a 2mL tip to transfer 2mL of MilliQ H20 into a liquid boat. Using the P100 multichannel pipette, add 20uL of MilliQ H20 to all wells of a 96 well PCR plate. Using the P10 multichannel pipette with filtered tips, add 2uL of your DNA to the corresponding wells of the PCR plate. Keep the PCR plate of diluted samples on ice.
Seal the PCR plate with a plastic tape sheet, vortex with the plate attachment, and centrifuge with ‘short’ setting, using a tip wafer as a counterweight. You now have a 1:10 dilution.
Step 9: Add DNA to all sample wells
- Use the P10 multichannel pipette to add 1 uL of the diluted DNA to each of the sample wells (cols 1-6 on plate 1, cols 7-12 on plate 2). Table 3 now reflects the contents of what is inside each of your sample wells.
TABLE 3 - Sample Wells
| Reagent | Volume (uL) |
|---|---|
| 1X TE | 49 |
| 1:10 dil. DNA | 1 |
Step 10: Add PicoGreen to sample AND standard wells
The PicoGreen mixture that you made in Step 9 can be poured into a liquid boat. Use the p100 multichannel to add 50 uL of PicoGreen to each well that contains a sample or standard. When adding the diluted PicoGreen, pipette up and down at least 20 times to mix sample, 1X TE and PicoGreen together. To keep track of which columns you added PicoGreen to, you can write down the column labels and cross them out as you go.
At this point, any wells not being used for samples or standards can remain empty. You do not need to add anything to unused wells.
Double Check: What ended up in each well?
All of the components within the standard wells
- Diagram of volumes of ladders and 1X TE required for each plate standard

All components within sample wells
| Reagent | Volume (uL) |
|---|---|
| 1X TE | 49 |
| 1:10 dil. DNA | 1 |
| dil PG | 50 |
Step 11: Prepare to run the plates
- Cover the plates with a plastic tape sheet and briefly spin down the plate to get all liquid to the bottom of the well. You can use the two plates as a counterweight for each other. If you only prepared one plate, find a counterweight on the shelf above the mini-centrifuge in the Lotterhos Lab.
Run Plate on Reader using Gen5 Software
- First switch on the plate reader to warm up (takes ~2-3 minutes).
- Using the laptop next to the reader, open Gen5 software. On the opening window make sure you are in the “Run Now” option on the left side column and click on the PicoGreen Assay full plate file.

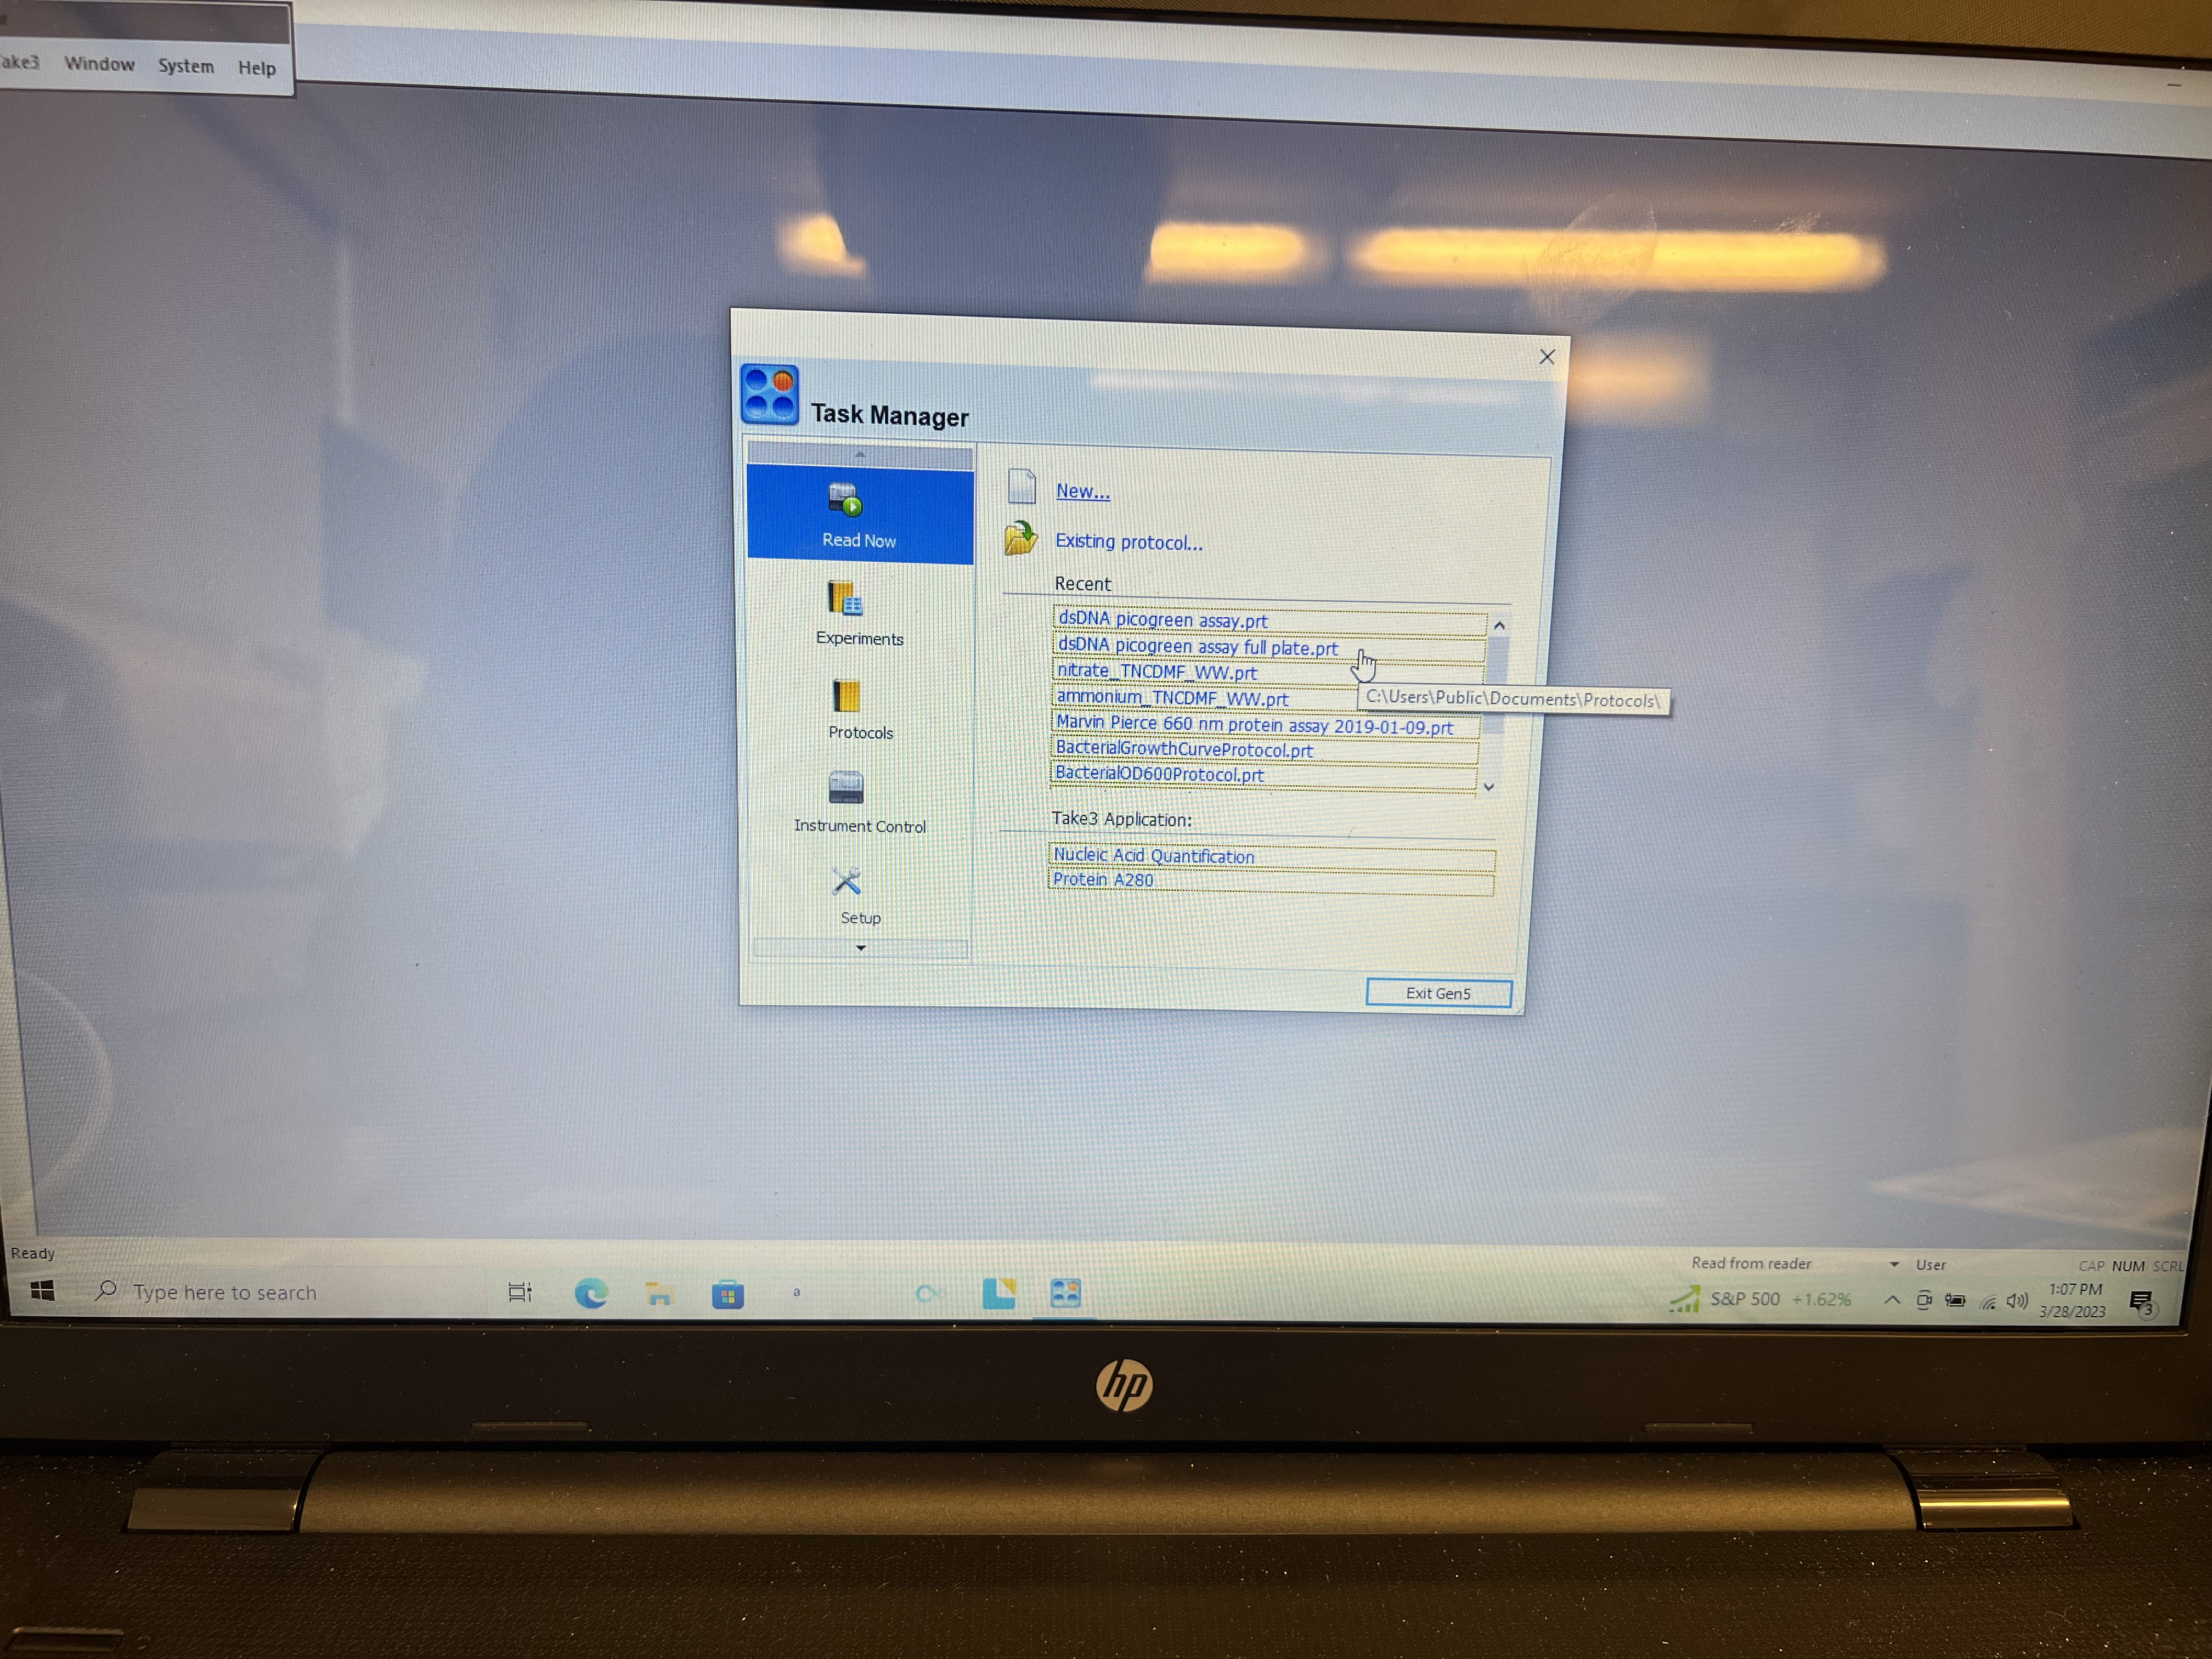
- This will open another window with a full plate already loaded. Click “cancel.”
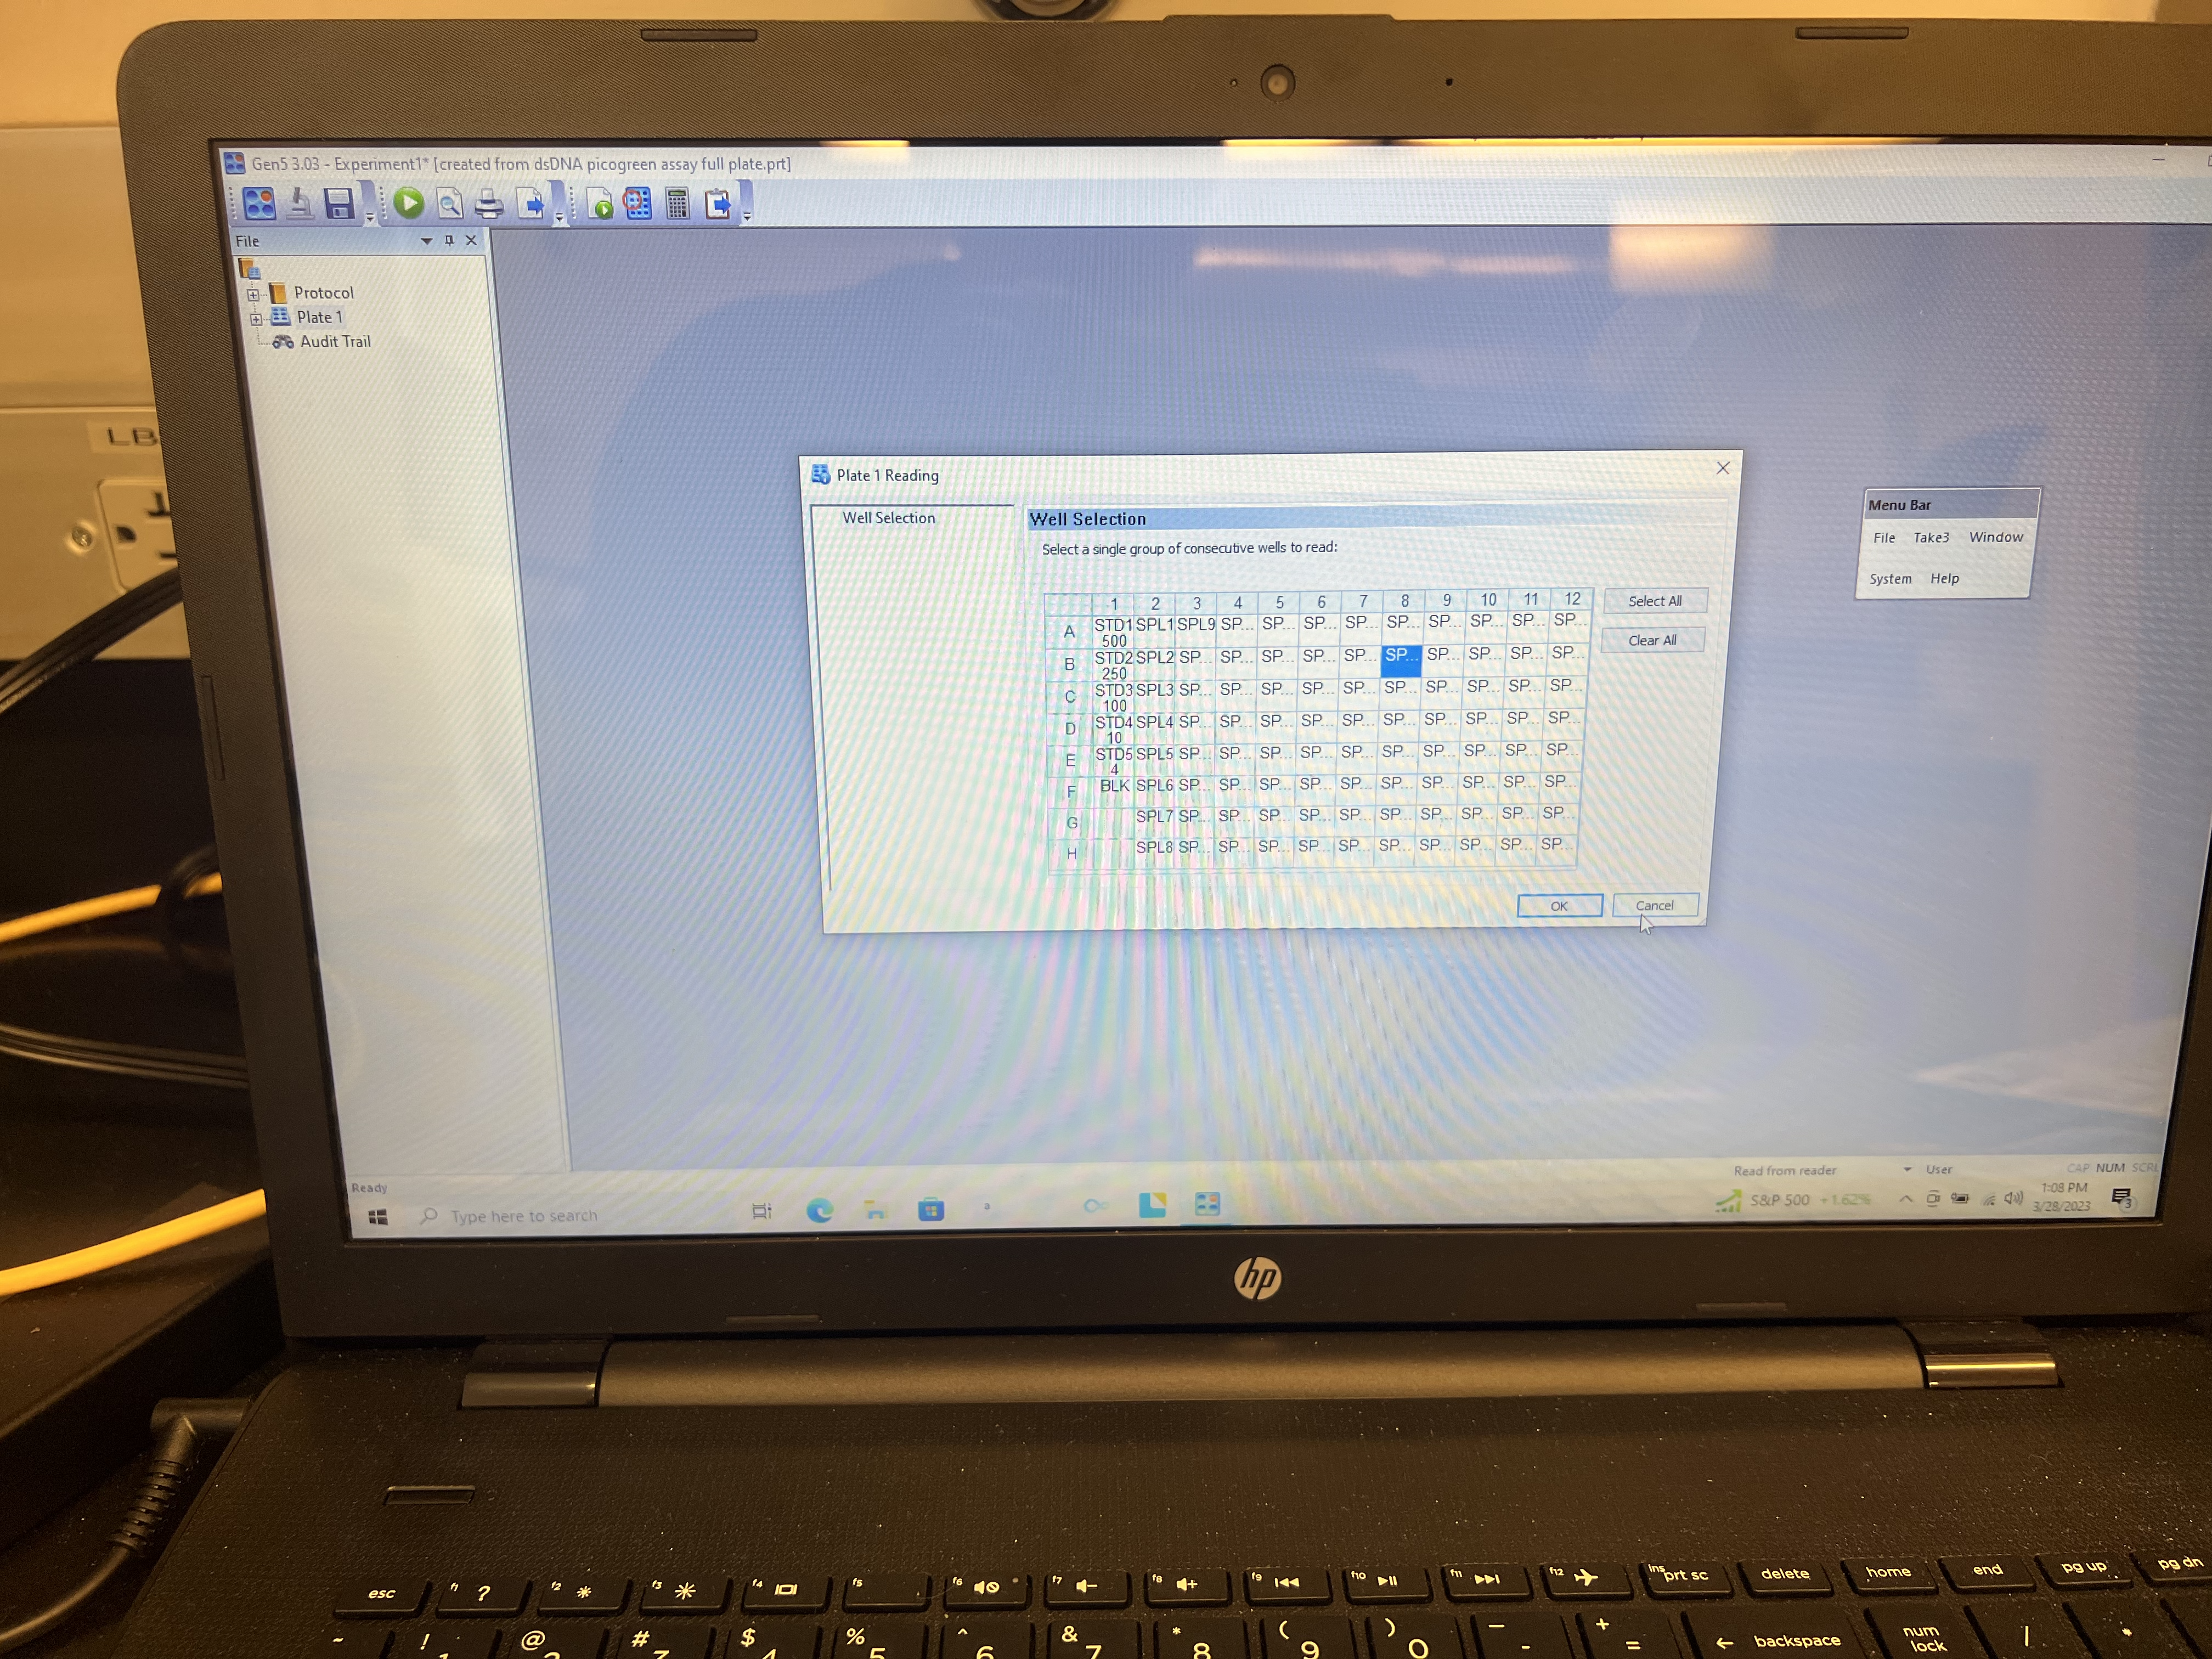
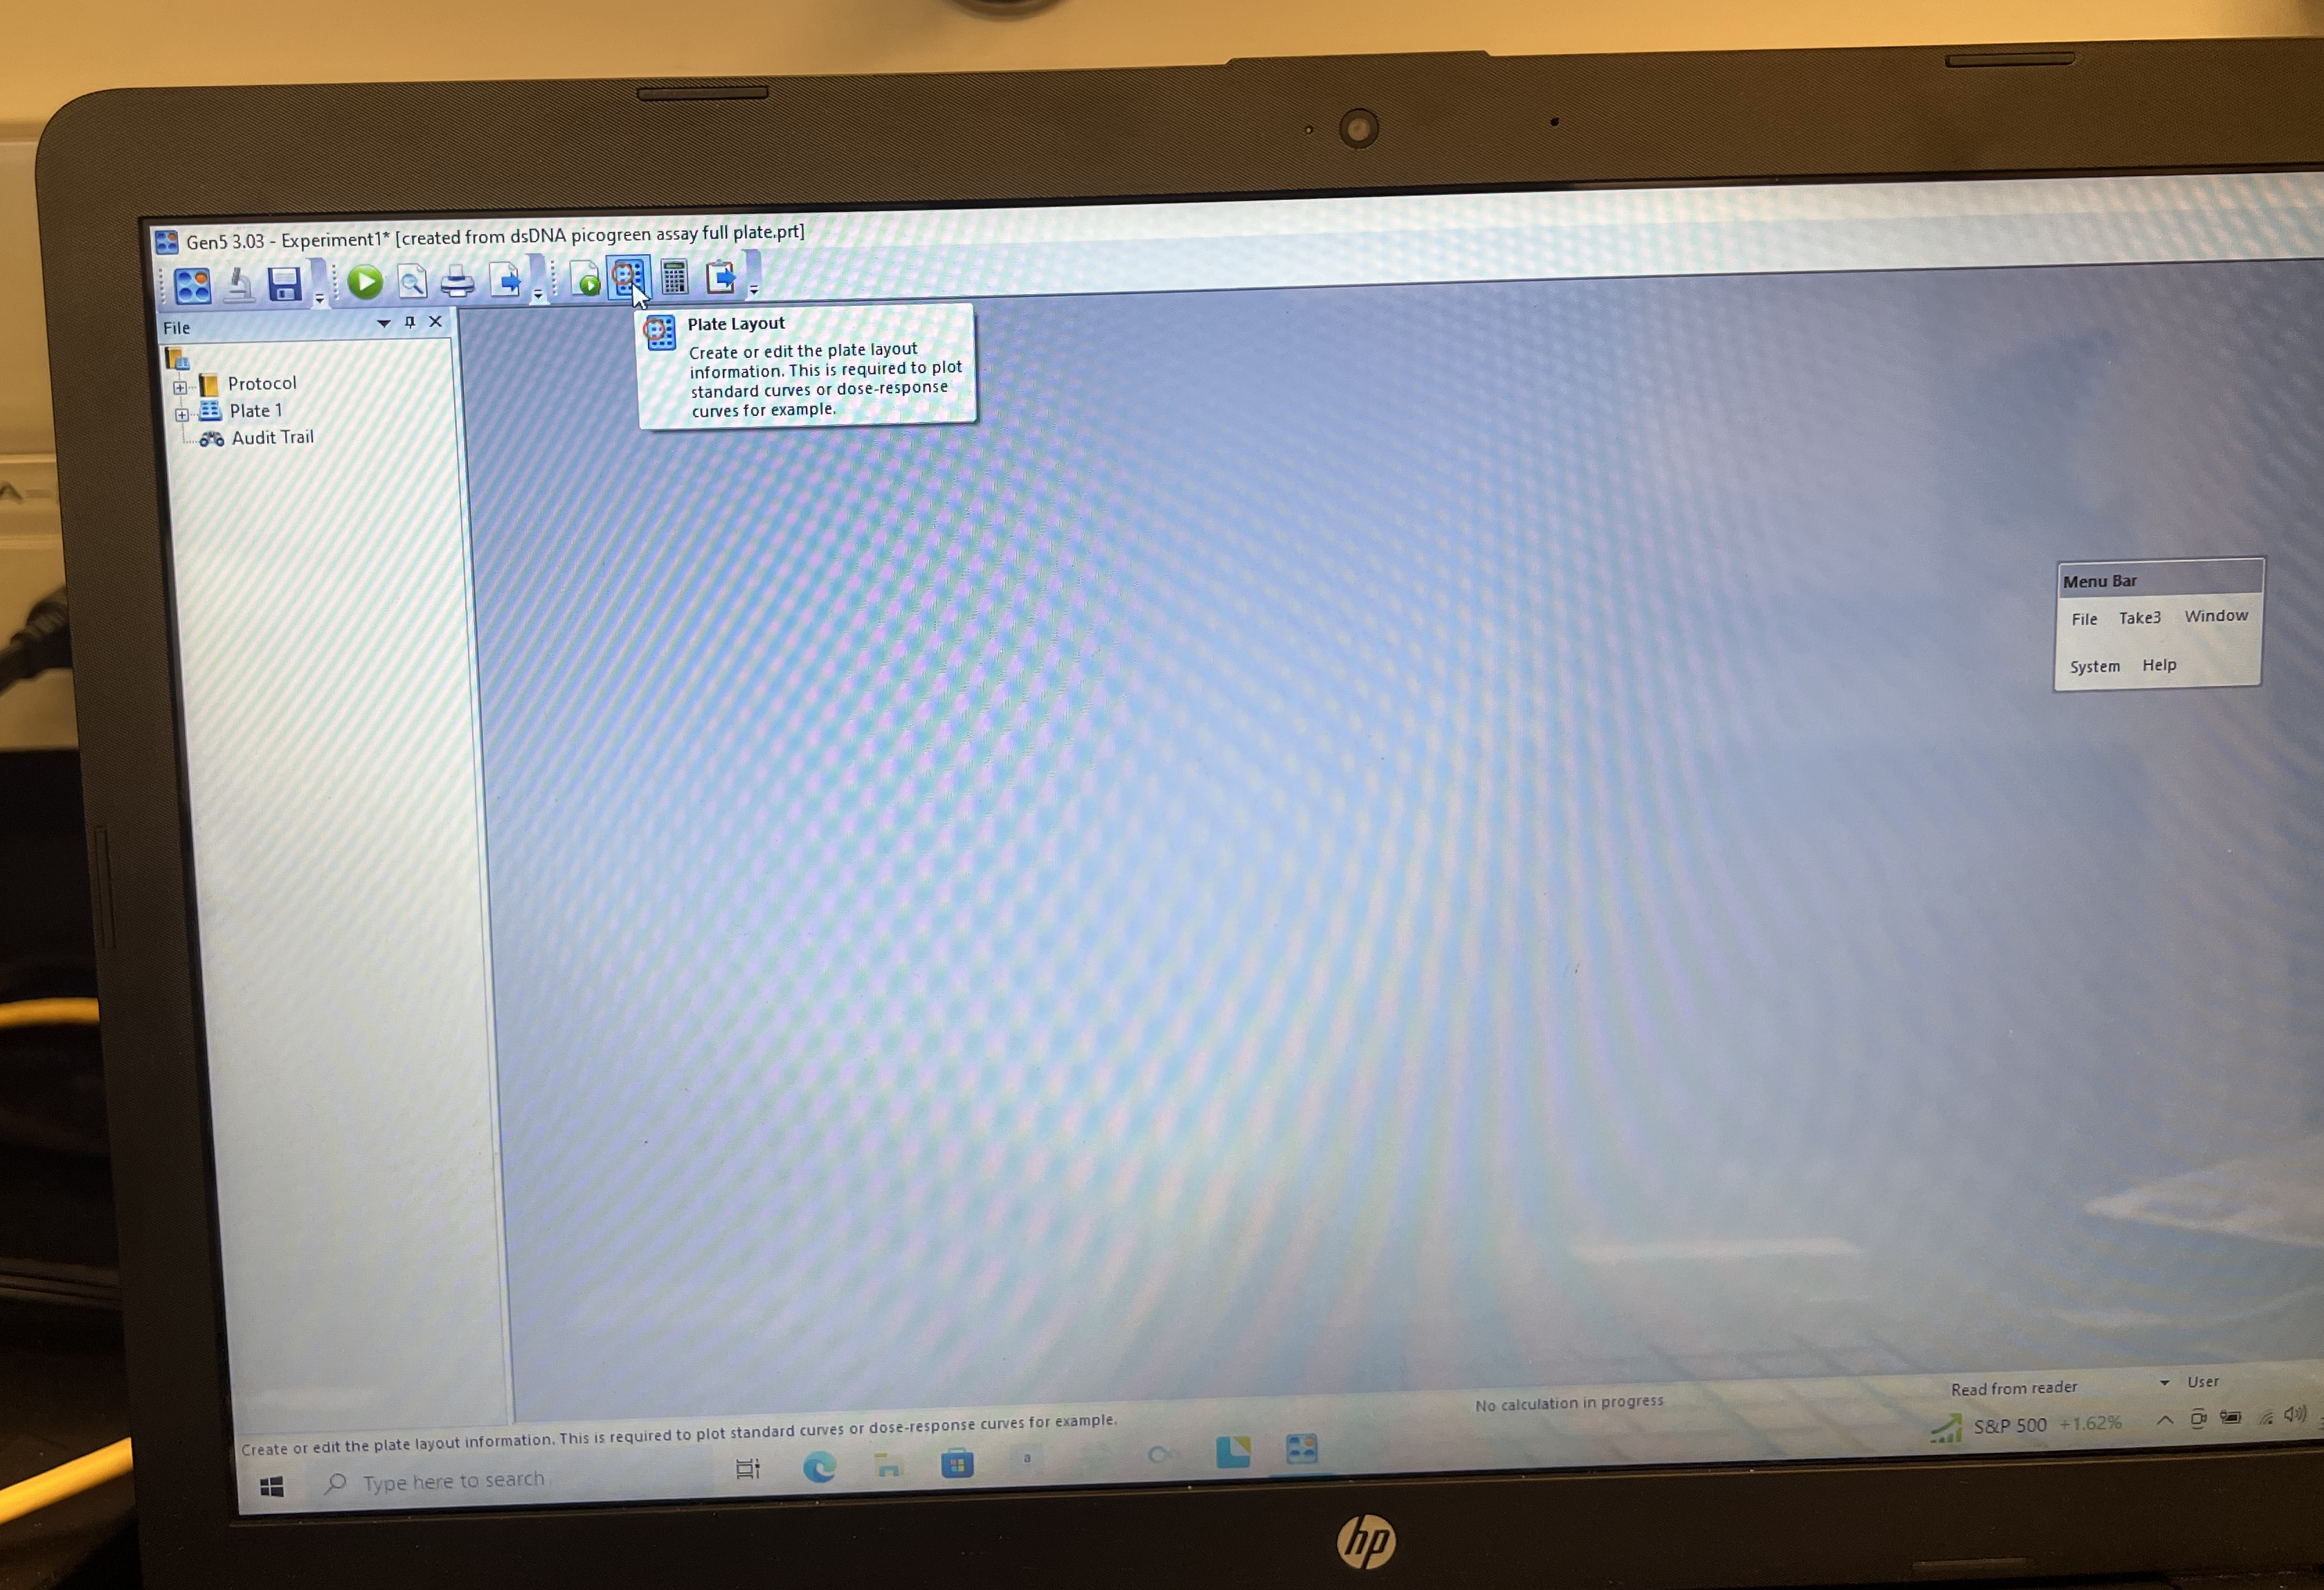
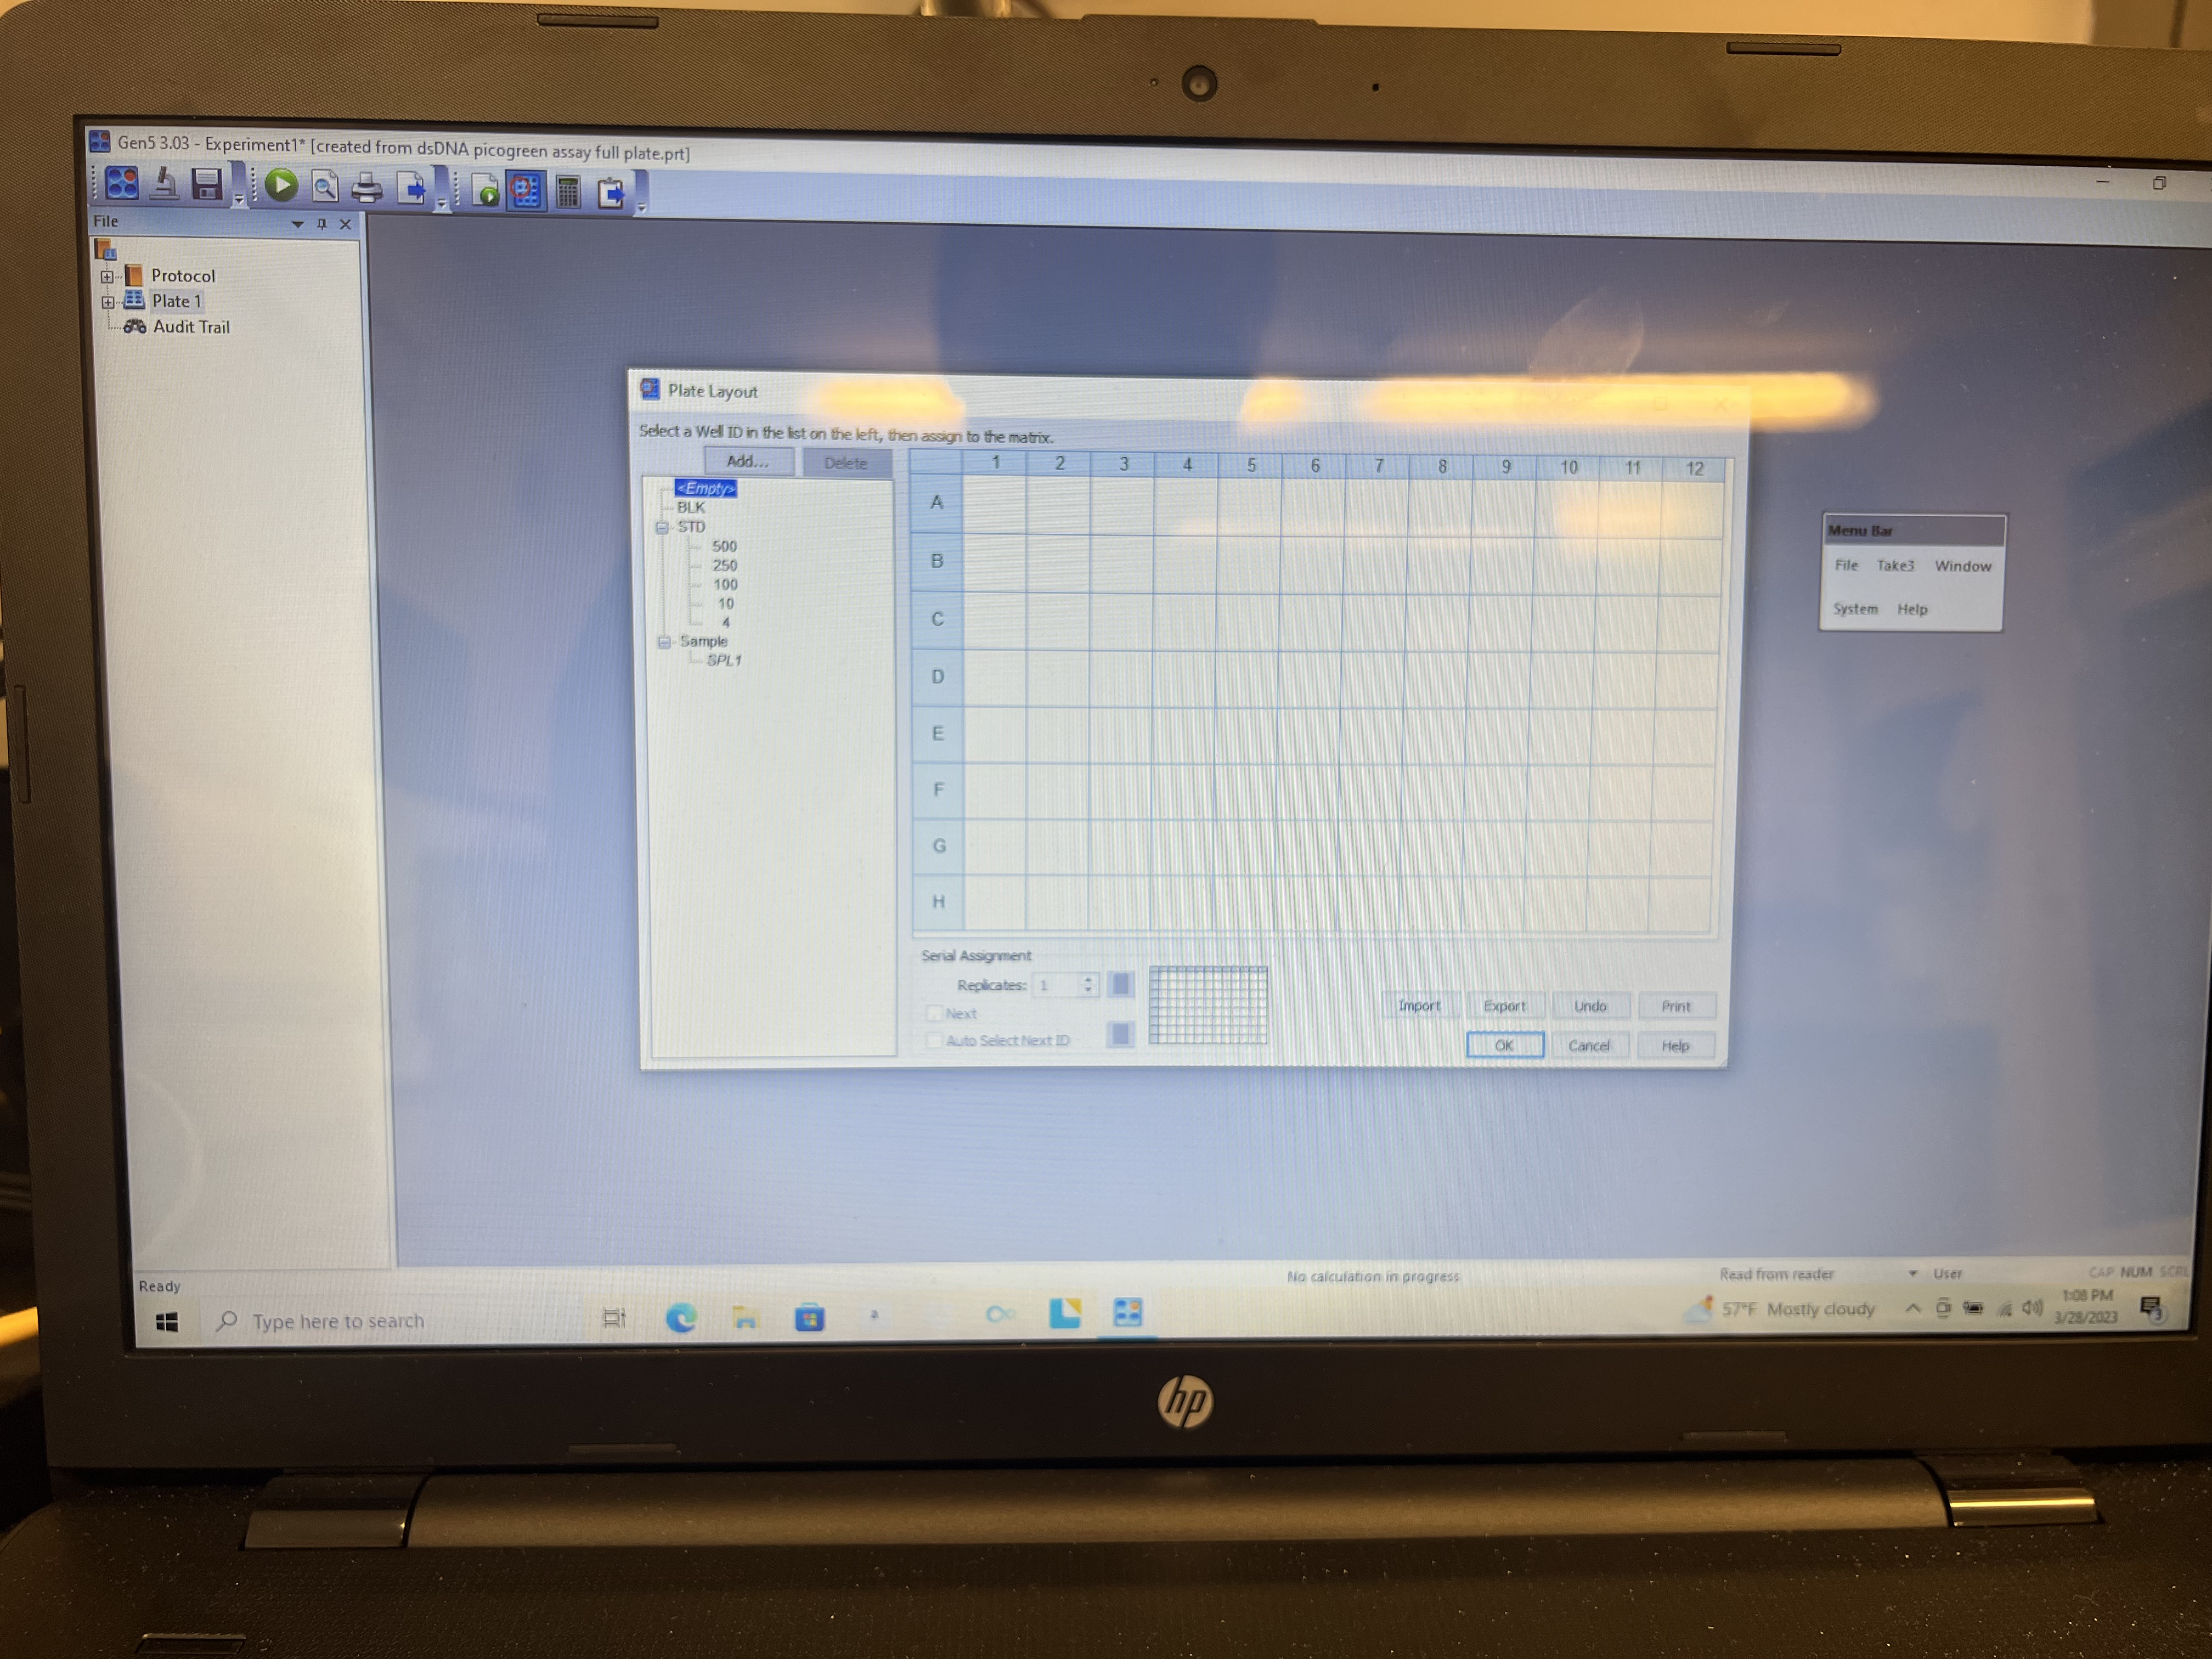
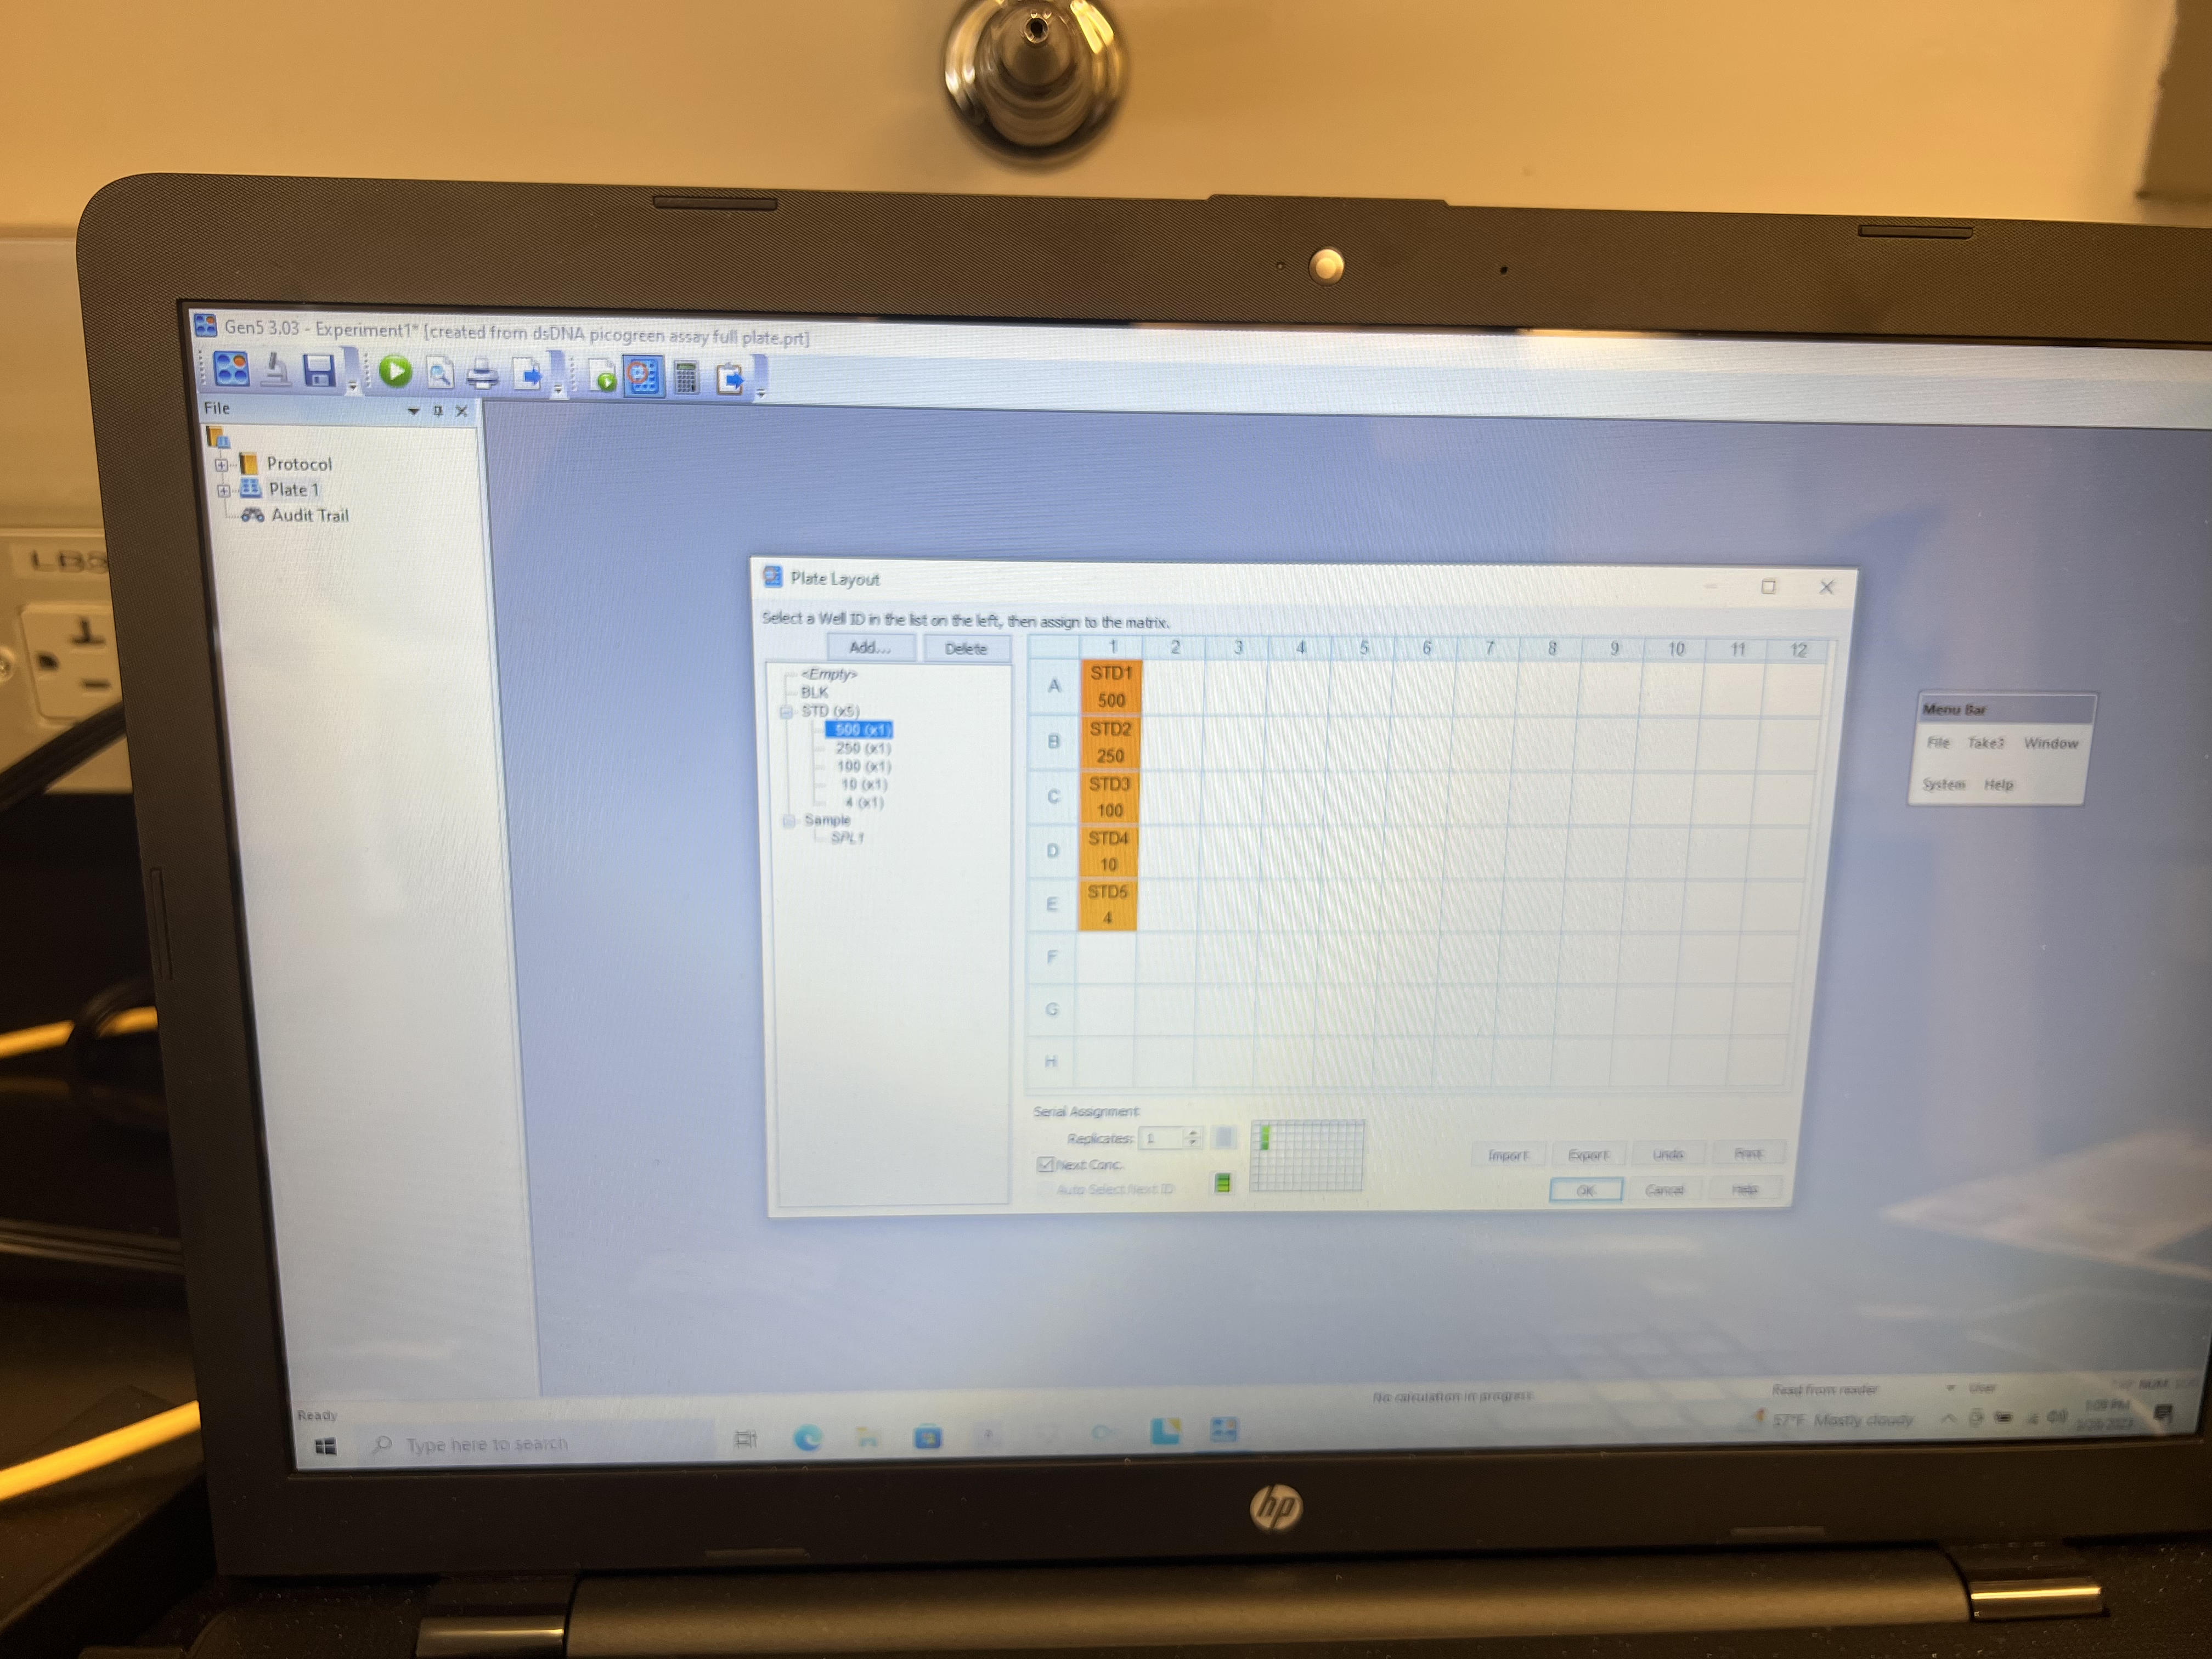
- Click the “Plate Layout” symbol on the top bar. It looks like a little plate with a red circle over one of the wells. This will open a new window with a 96 well plate. You can then specify where your standards, blanks, empty wells, and standard wells are.
- Clear plate by highlighting “EMPTY” on the left panel and click and drag across whole plate.
- Click the first standard curve value in the left panel and click on the well where that standard is located. You can click and drag down the column to fill in remaining standards if they are in numeric order.
- Highlight the first sample (SP1) from the left panel and click on the well with your first sample well and drag across the plate until all wells you want readings for are filled. You don’t need to put in any information for empty wells.
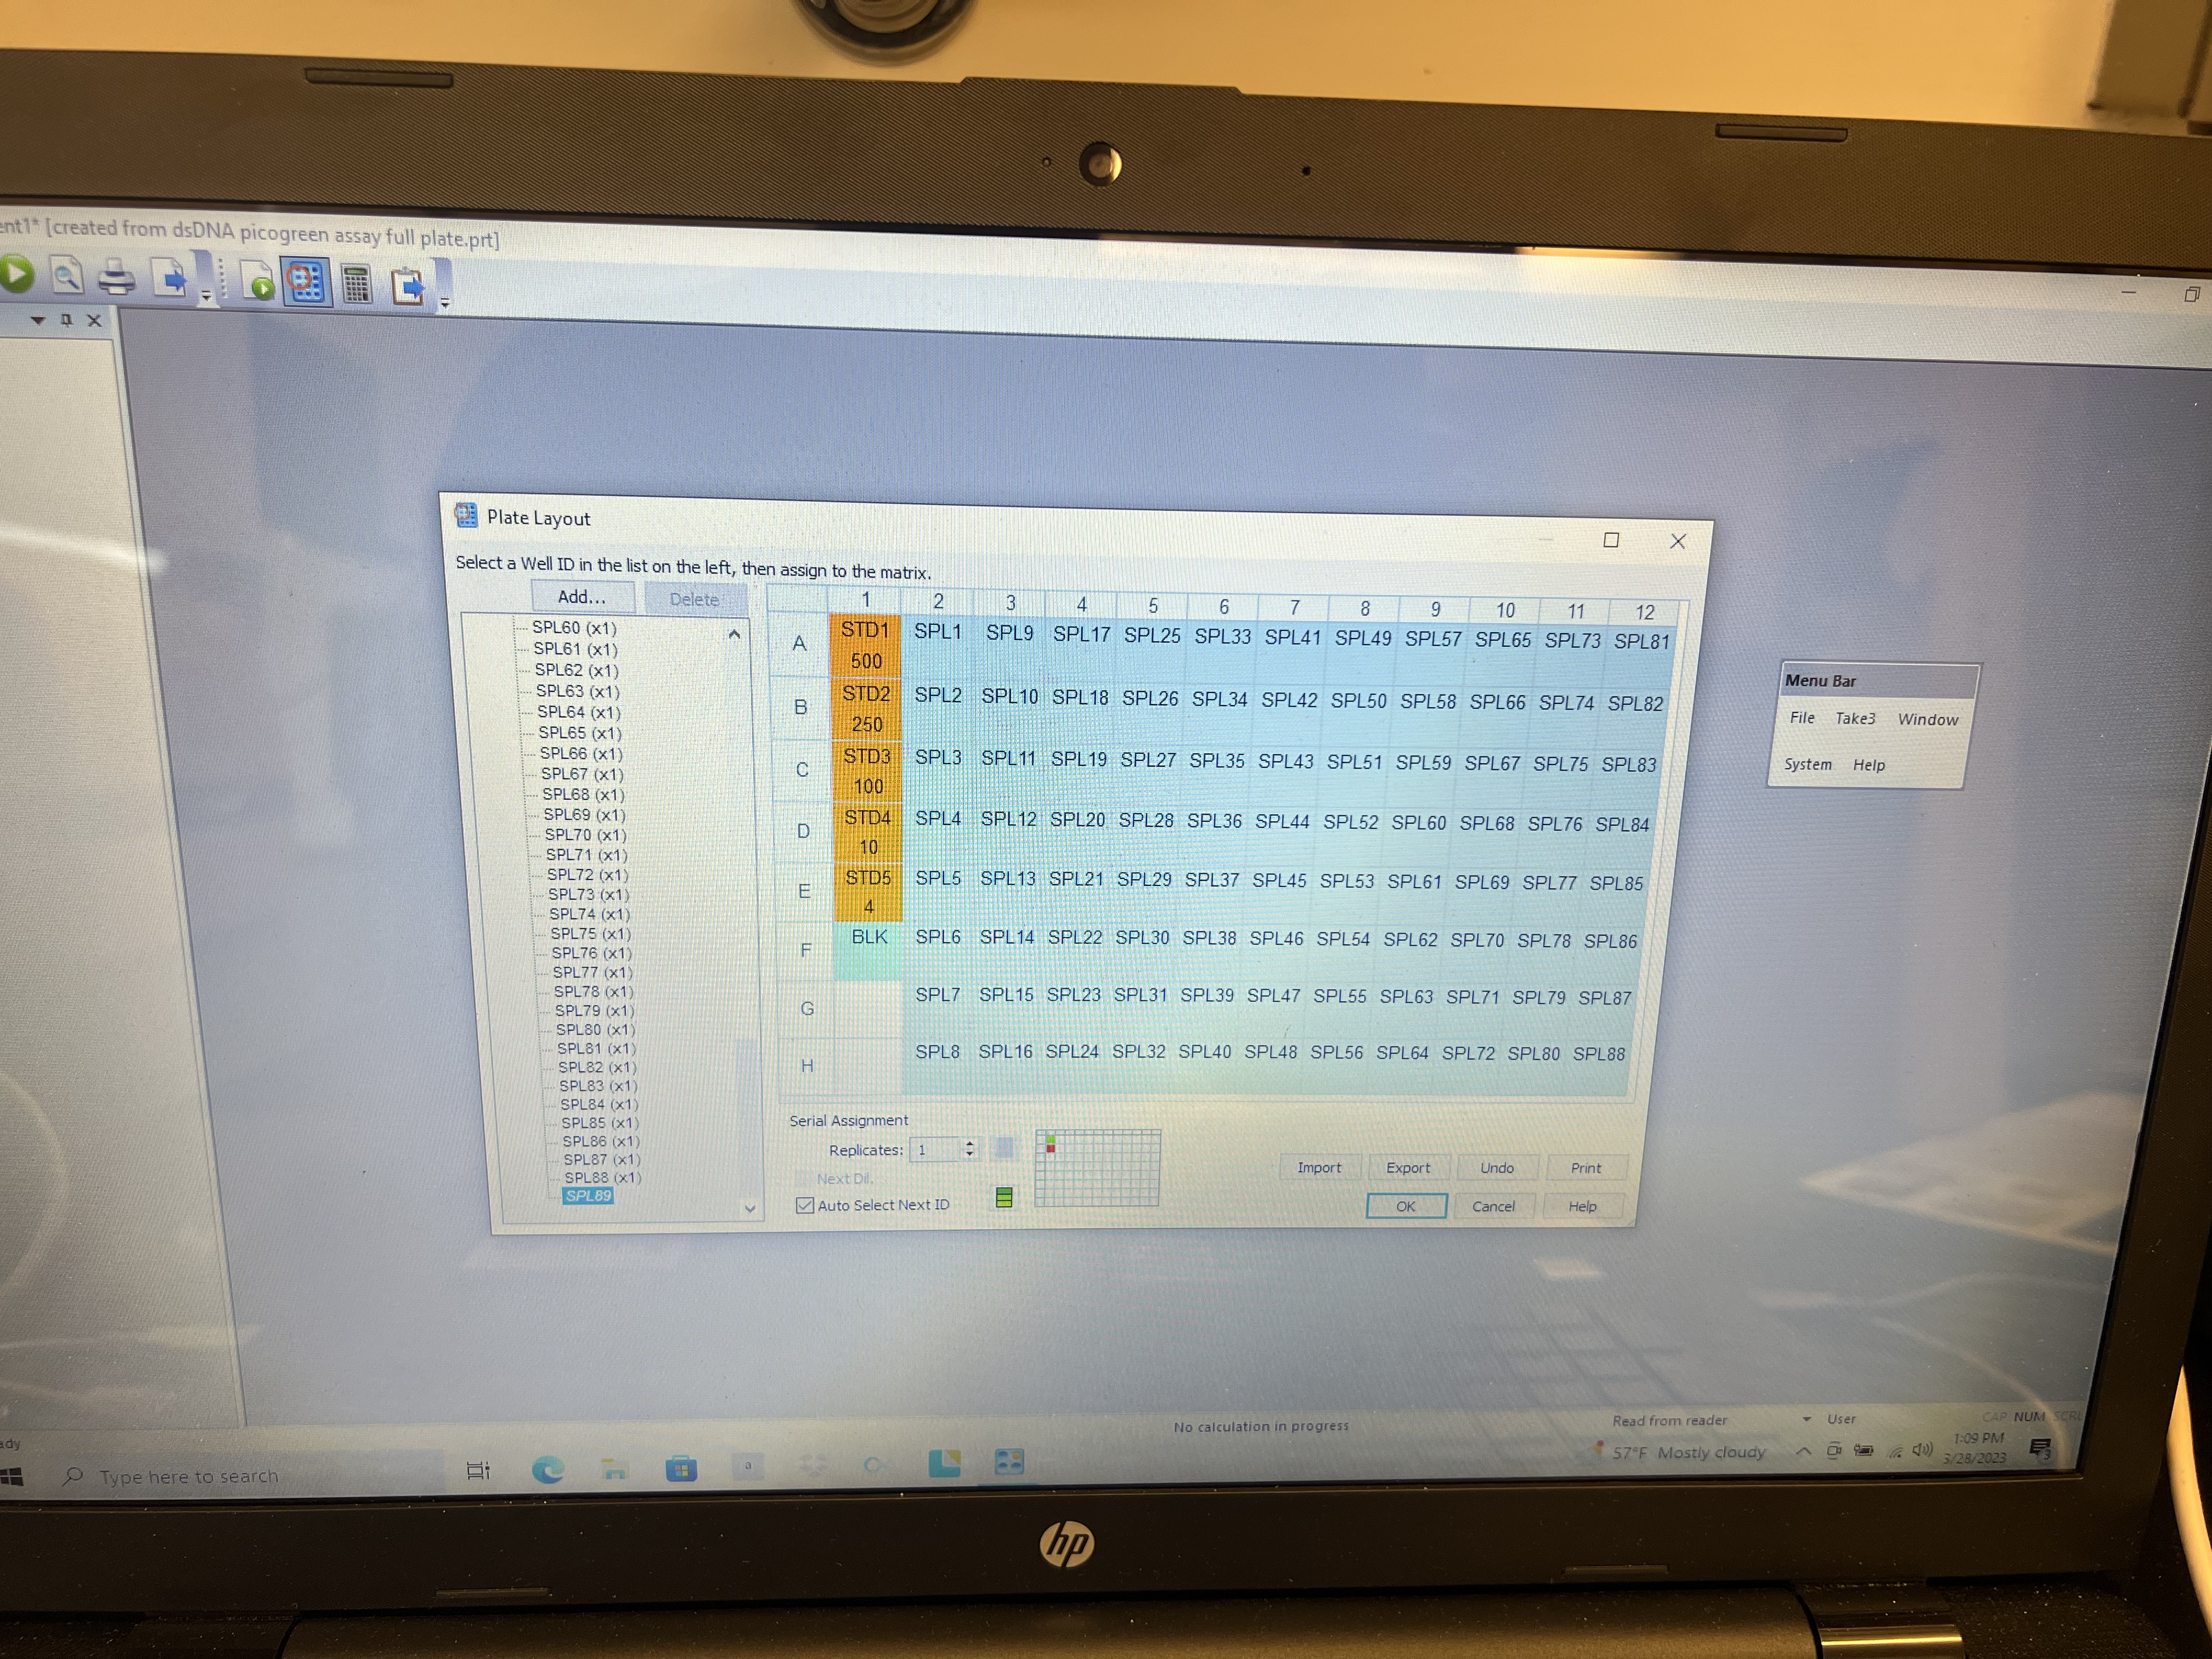
- When this is done click “okay”. The machine will have a bulb warm up period after which it will ask you to load your plate. You do not need to close the drawer it will close automatically after you load the plate and click “okay”.
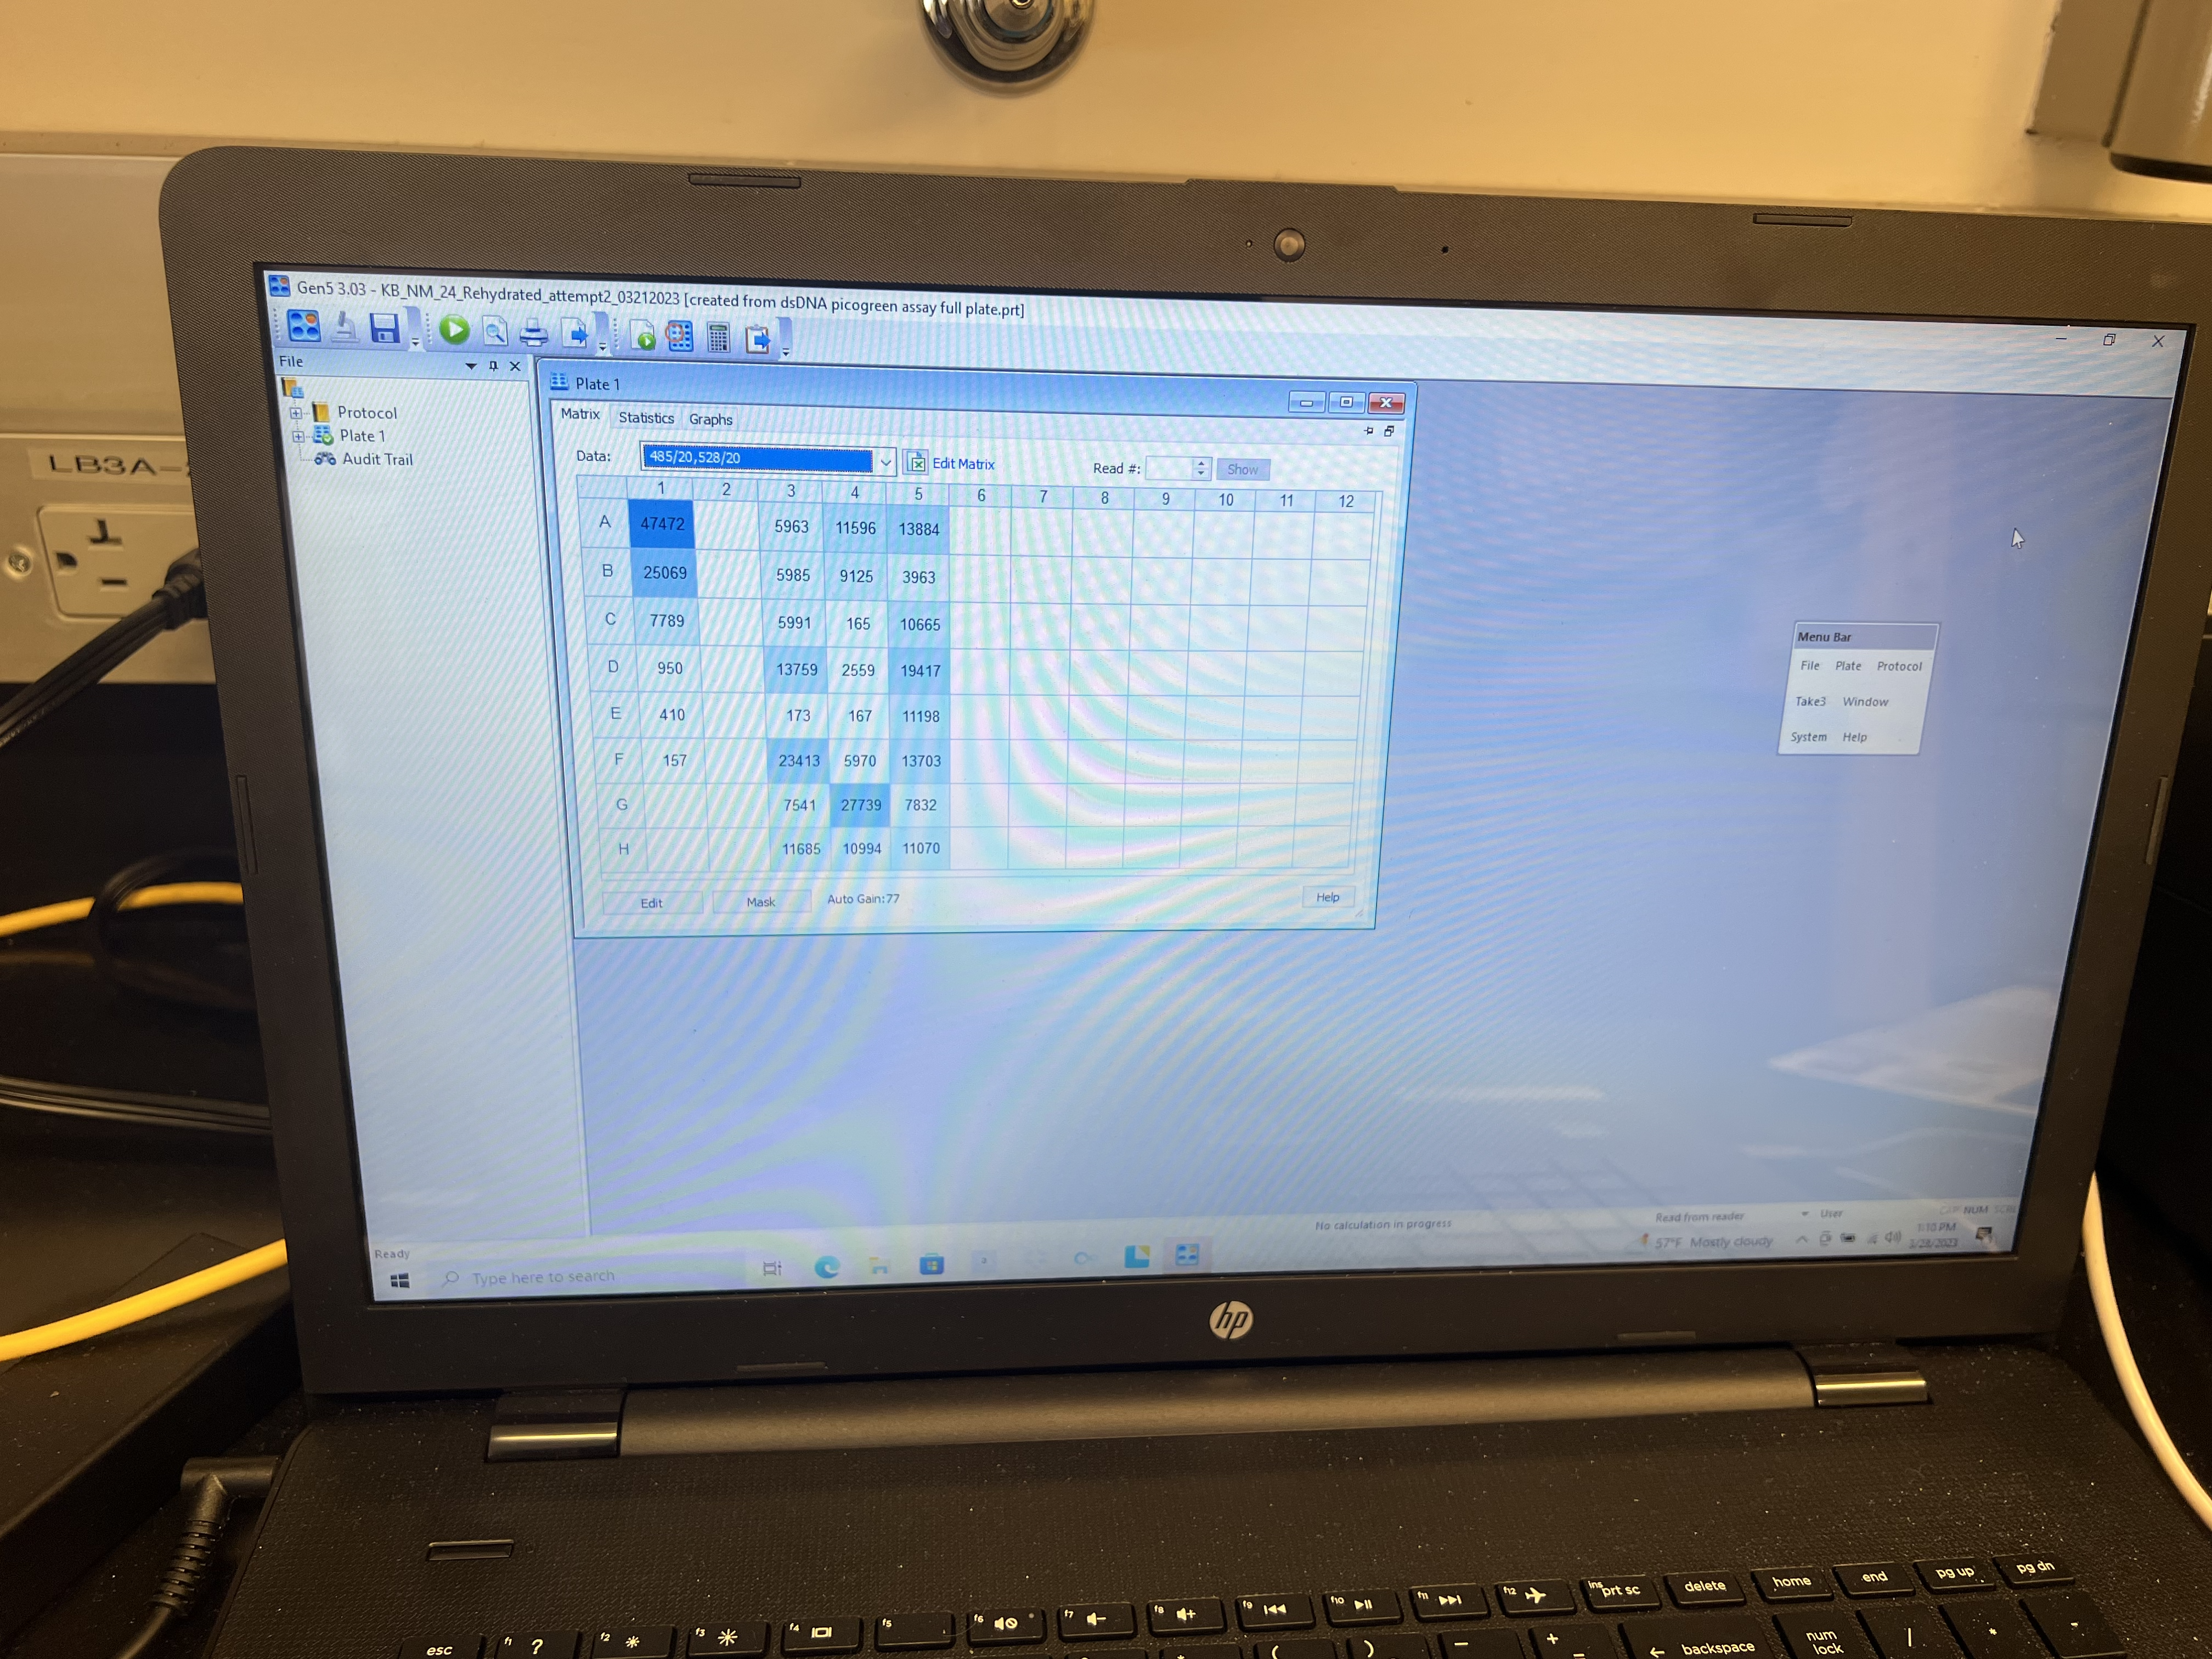
Make sure the plate is loaded with well A1 in the top left. There’s a marker for A1 in the top left corner of the plate reader tray to indicate how to orient the plate. You can only run a plate through the reader once, so make sure you run it properly.
- The run should take 2-3 minutes. Once complete, click on the “Statistics” tab and output that spreadsheet to an excel file or Google sheet by copying to clipboard and pasting.
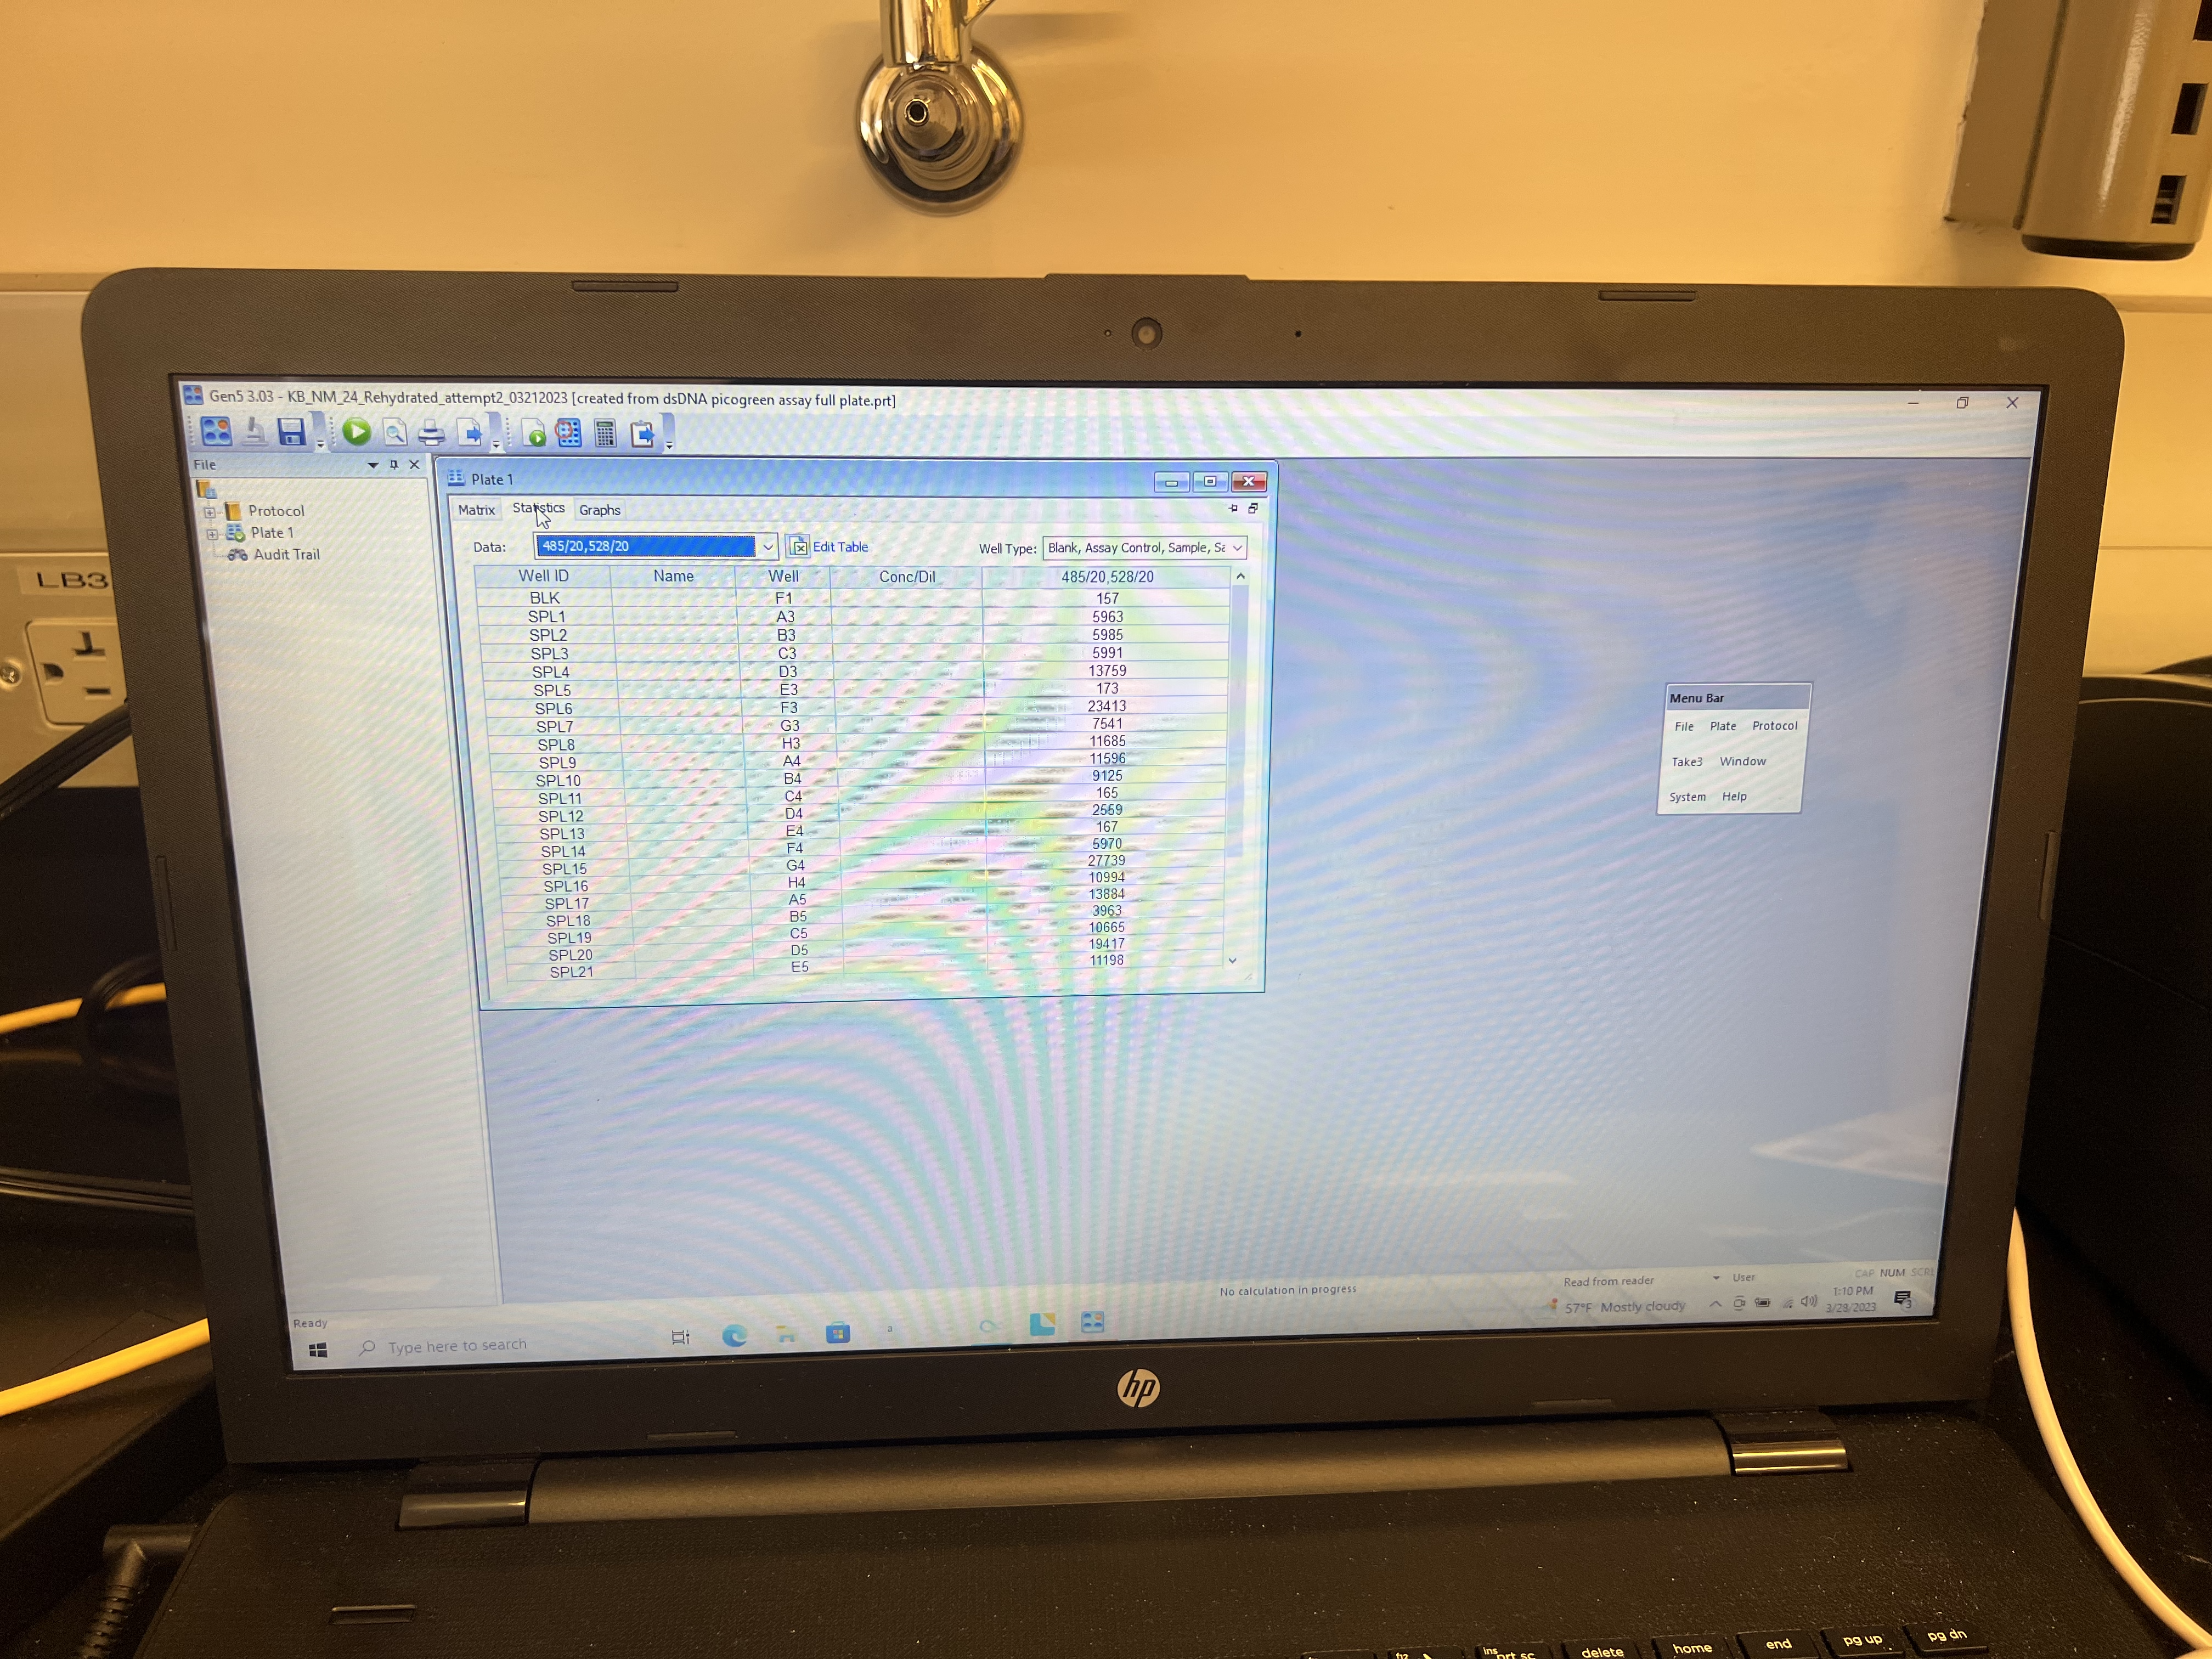
- Finally use the spreadsheet to convert absorbance values to associated concentrations.
Calculating Concentrations
The plate reader outputs concentrations in RFU (relative fluorescence units). You will need to convert these values first to ng/mL, then to ng/uL using the following steps. Keep in mind that the concentrations determined by the PicoGreen are for the 1000X diluted DNA that was created for the assay. This DNA has the unit ng/mL. To find the concentration of the undiluted sample, you will need to multiply your PicoGreen concentration by 1000. Then, to convert from ng/mL to ng/uL, divide by 1000 (1 mL = 1000 uL). Hence, the 1000s cancel out and the value of the concentration of the diluted samples in ng/mL is the same as the value of the concentration of the undiluted samples in ng/uL, so no math is really necessary. See image below for math. 
- Plot your standards in a scatter plot with concentration in ng/mL on the x axis and RFU on the y axis. If doing this in Google Sheets, go to “Series” in the chart editor, and add a linear trendline to the graph. Label the line with the line equation. Check the box next to R^2 to show the R^2 value on the graph. You will use the equation of this line to convert the RFU values for your samples to concentration in ng/mL.
The R^2 value describes how well a set of data points fit a particular trendline. A value of 1 indicates a perfect fit, while a value of 0 indicates no fit between points and the line, meaning the line is a poor description of the data. If your R^2 value for the standards is below 0.99, you should redo your PicoGreen assay.
Example of a Good Standard Plot (R=1) 
**Example of a Bad Standard Plot (R=0.86)

- If your standard curve has an R^2 value of less than 0.99 as in the example above, redo the PicoGreen assay.
Rearrange the equation of the standards line to solve for x. In this case, x is your concentration in ng/mL and y is your RFU value, which the plate reader determined.
Make a new column in your datasheet for concentrations and use the equation above to solve for concentration based on the RFU values. You can copy this equation down the datasheet to avoid having to retype it after writing it the first time.
As described above, the resulting concentration is in ng/mL and describes the concentration of the 1000X diluted DNA samples that were used in the PicoGreen assay. In converting from diluted to undiluted DNA and from ng/mL to ng/uL, the conversions cancel out, so the concentrations calculated in this step represent a) the concentration of the diluted DNA in ng/mL and b) the concentration of the undiluted DNA in ng/uL. Describe all original, undiluted DNA concentrations in ng/uL.
You may choose to divide sample concentrations by 2 to make up for the 2x difference between PicoGreen and Qubit concentrations sample. This value represents the final concentration of your undiluted samples in ng/uL.
Record sample concentrations in the datasheet or app.